Showing posts with label Tutorial. Show all posts

Sunday, April 19, 2009

Improving Your Drum Track, Part 1: Getting Started With Independence Free

In a home studio, it is easy to make electronica, techno, and dance tracks. There is an expected level of machine-like precision to the music. Perfectly accurate precision and artificial drum beats are readily acceptable. (Let me go on record with a disclaimer: making those forms in a home studio are easy. Making good or great tracks is another story. I am not trying to downplay the level of artistry involved. I saw Aphex Twin spin live in the mid 90's, so I can appreciate the level of complexity of the art form.)

Where it becomes much more of a challenge in the home studio is when you're trying to sound like a traditional band (guitars, bass, drums, vocals). There is some level of trickery that is required to achieve your desired sound for all of these instruments. Right now I want to focus on the difficulty of drummers. Much like Spinal Tap, I have always had a hard time keeping a drummer on call. And then you have the acoustic issues of sound isolation, excess mic bleed, having enough mics and inputs to record the whole kit, complaints from the neighbors, etc. As usual, I will be focusing on use of this within REAPER.

My Dream Drums, For Now
Years ago, I had a Yamaha RY-30 Drum Machine. Bought it used for $330 in about 1993. Like an idiot, I sold it around 1998. Now they're hard to find, but it had very sweet sounding drum kits. Their natural kits were extremely beautiful, using 16 bit samples at a time where the average home user was rocking out to 8 bit. Listening to old recordings I did with that drum machine make me once again regret having parted with it. I have been working to try to achieve the "is that a real drummer?" sound and feel using only free tools.

This is the first part of an ongoing series of posts that will be focused on the best tools I have found to "fake a drummer" and how to tweak your drum tracks to get the "real" drum feel.

Yellow Tools Independence Free
One of the best all-in-one packages I have found so far is Yellow Tools' Independence Free 2.0. As the name implies, this is the free version of their very robust sampler tool. There's a couple features disabled in this version, and the bundled sample library is "only" 2 GB of data. The "Basic" version ships with 12 GB of samples, and the "Pro" version ships with a whopping 70 GB sample library!

My initial goal is to have one or two good "natural" kits. Included in the free 2 GB library are 6 acoustic drum kits, so there are plenty of options. The kits have multiple velocity samples for each sound, so there's more detail than your average single-sample kit.

So What's Missing?
The Free version lacks a couple of major items. The most notable is the lack of ability to import your own samples. The other is the lack of ability to import 3rd party VSTs. Of course, if you're hosting this in your own DAW (like REAPER), that's not really a problem. You can add your VSTs to the chain after Independence Free, and have as many add-ons as you want. Lacking the ability to import your own samples is more of a concern if you want to branch out into custom kits. Later in this series I will tackle this issue with another tool.

How Do I Start?
You can start by going to Yellow Tools' website at http://yellowtools.com. Under their "Products" section, you can find Independence FREE. You'll have to register on their site to download it, but registration is free. All of this is detailed on the page. (Alternately, you can pick up a copy of the UK magazine "Computer Music", which comes with a DVD that includes the "Independence Free CM Edition". Same thing, with an extra logo on the UI. You will still have to register on the site & download the instrument files separately, however.)

When you install it, the installation location is for the standalone app only. It will prompt you separately for the location for the VST. Either install in with your other VSTs, or add a path in REAPER's VST configuration screen to find it. Either way, the next time you boot REAPER, you should see a new entry in FX "VSTi: Independence Free (Yellow Tools) (24 out)"

Starting Simple
To start a simple track in REAPER, open a new project. Insert Independence Free as a VST, and then open it. Your first view is probably going to be overwhelming. This is a very complex and sophisticated interface. Since we're starting simple, look for the layer controls. There will be a highlighted item that says "01 click here to load instrument". When you click on it, you will get a popup menu. Select "Load Layer". When the standard file requestor opens, navigate to the "Independence Free - Instruments" folder, and then into "01 Acoustic & Electronic Drum Kits". The .ytil files are the ones you care about. Select "Acoustic Drum Kit 1.ytil", and click "Open". Now your Drum Kit is ready for you on MIDI channel 1.

If you want to hear the sounds in this "layer", click on the "Mapping" button at the top of the VST's display. You will get a piano key layout, with colored bars representing the samples. If there are breaks in the line, that represents different samples used for different velocity ranges. As you can see in this kit, there are 11 velocities for B1 and C1, which are your kick drums. You can play the samples on the keyboard by clicking on them, but it is not going to be easy to trigger at varying velocities that way. It's easier using REAPER to control it.

Close the FX chain window and insert a "New MIDI Item" in the track where you set up Independence Free. Hit some notes, and you'll hear your new drum kit. How simple is that?

Ummm....What Happened To My Octave?
The first thing you might notice when you compare Independence Free to REAPER's piano roll is that the octave notations don't match. What Independence Free calls C1, REAPER calls C2. This is a common problem across music apps, because of differences in opinion on what octave is considered to contain middle C. You have 2 options: make a mental note of this difference, or reconfigure REAPER to honor the offset.

To reset REAPER to use the same notation as Independence Free, go to Options->Preferences->Media->MIDI. The option "MIDI octave name display offset: 0 octaves". Change the value to -1. Now REAPER will call the notes the same as Independence Free. This change only affects the labeling in REAPER's piano roll. The same/correct MIDI note numbers will be used regardless of this setting.

What Now?
Start experimenting with the kits available and see how good the samples are. Be sure to vary the velocities, so you can get the full impact of the multi-sampled drums. So far I've been quite happy with the kits in Independence Free. Keep in mind that this is a sampler tool, NOT a drum machine. Look at all the other instruments that come bundled with it. They are of equally high quality and very useful in their own right.

Up Next...
In Part 2, we will go into more features and uses of Independence Free as a drum machine, including adding effects, using multiple ins and outs to minimize CPU usage, and some other random tweaks.

Read the full post here!

Thursday, November 13, 2008

REAPER Tutorial: Multi-Out Drum Tutorial

One of the hardest parts of a home studio to "get right" is the drums (unless you happen to really be a drummer). In a world of free and/or cheap tools it is hard to find a good virtual drum kit that gives you the options needed to get a solid drum sound and have the ability to mix the drums off into separate channels.

With most free drum VST instruments, if you want to be able to treat each drum separately (i.e. if you wanted to do something like add some extra reverb to ONLY the bass drum), you would be forced to use multiple instances of a standard drum VST, and program each drum sound as a separate instrument. This causes 2 problems: it increases your processing overhead by running 8 or more versions of the same VST (eating your CPU power like candy), and it is really hard to lock in your drum pattern when you're dealing with so many separate MIDI tracks feeding the sound of your drums. Notice I said "most free drum VST instruments"?

GTG Drum Sampler I
GTG makes some absolutely wonderful drum sampler VSTs (and some pretty good synths, too). Most of them feature a stereo out, but the GTG_DrumSampler I features a total of 9 outputs; 1 main output and 8 individual outputs for each piece of the drum kit. The UI has a nice picture of a Drum Kit, and the drums vibrate when they are played, which is a frill, but it's a nice touch.
Configure Your Outputs
First we want to configure the track itself for the drums. Since we know GTG Drum Sampler I has a total of 9 outputs (8 for individual drums), we will need to reconfigure our track for 8 channels. On the track where you want the drums, click on the "io" button on the left of the track panel. This will open the routing window for that track. There is a field in the top left labeled "Track Channels". This usually defaults to 2. Change that to 8.


Configure the Drums
Now that we've expanded the channels that this track will control, let's go to the UI of the DrumSampler I. In the top right of the window, there is a button labeled "9 Outputs". Click this to get the routing matrix for the drum kit. You will get REAPER's attempt to do what you want, which is a stair-step appearance, and completely useless as it is. It is useless because as is you will ONLY hear the bass drum. Here is where the labels take some getting used to. If you just want to hear all the drums together, you need to fill in the boxes for outputs 2 through 9 across the top row (Channel 1). This will play all the sounds through the left channel.

For our purposes, we want all the drums isolated. So instead, let's make the routings in this order: 2->Channel 1; 3->Channel 2; 4->Channel 3;etc. Your routing diagram should look like the one shown here:

This configuration means that the first drum (bass drum) will be output on channel 1, the second instrument (snare drum) will be output on channel 2, and so forth. To see a complete list of the outputs, click on the INFO text in the to middle of the Drum Sampler interface, and it will change to a drum assignment listing. With the way it interfaces with REAPER, these numbers are 1 below the way the output is numbered in REAPER. (BD = 1 actually comes out on output 2, according to REAPER's routing).

Make the Targets
Now we need to make the target tracks for all the drums to go to. We will need 8, and you should probably name them according to the drum to avoid confusion later on. In order, they are: Bass Drum, Snare Drum, HiHat, Tom High, Tom Mid, Tom Low, Cymbal Crash, Cymbal Ride. These new tracks will be IN ADDITION to the track that you have the drum kit installed on.

Lock The Feeds
Now that we have the channels isolated, and somewhere to send them to, we need to enable the sends. Go back to your original Drum pattern track, and click the "io" button again. The first thing we want to do is disconnect this track from the master. We do this because we only care about the drums coming through the individual channels, not from this pattern directly. Disconnect this by removing the check mark from the "Master/Parent Send" option in the top left of the window.

Now click on the drop-down "Add New Send", and select the track you named "Bass Drum". This will create a new block in the window about the send to the track named "Bass Drum". Below the sliders are a couple of drop-downs labeled "1/2 => 1/2". These are channel numbers, and it defaults to paired sends. "1/2=> 1/2" means "send channels 1 and 2 from this track to tracks 1 and 2 on the track I'm sending it to". In our case, we know that the Bass Drum is on Channel 1, since that's what we set up on the Output Routing in the VST. So change the FIRST "1/2" to "1". We will leave the target as "1/2", because that will put the drum as a stereo track in the target track. That's all we need to configure this send.

Now go back to the drop-down "Add New Send", and select the next track, "Snare Drum". Go to the new section it created, and change the send to "2=>1/2" so we send channel 2 to the Snare Drum track. Repeat this process for each of the drums.

Try It Out
That's it! Now insert a new "Empty MIDI Item" on your original drum track, and build a drum pattern. As it plays, you will notice that the mixer controls will show that the levels are coming from the individual drums as they are hit. Build a pattern with all the drums, and play it in a loop. Now you can start playing with adjusting the levels on each drum individually, as well as adding "fx" to individual drums (like the reverb on the bass drum example).

This is a fairly simple example, but by using simple track sends, you can also simulate mic bleed between drums (by adding a send between the drum tracks, with very low volume), among other ideas.

Other Notes
I should also mention that this wonderful drum kit comes with a pretty decent single kit of drum sounds. As far as a standard drum kit, they drum samples that come pre-loaded are pretty solid and will work great for quick drums without the need to sift through samples to build a kit. If you don't like the sounds, you can still load your own through the interface.

Also, the one drawback to using this drum VST is that you are limited to an 8 piece traditional setup. So if you want a double-bass kit, heavy cymbals, extra toms, etc., then you'll need to either use multiple instances of this VST with alternate drums, or upgrade to more serious software. But for simple drum tracks, it's still a great place to start.

Read the full post here!

Friday, November 7, 2008

REAPER Tutorial: How To Save A Project From A Bad Plug In

One of the risks of using virtual instruments and effects is that not all are created equal. You will run into compatibility problems with certain plug ins in certain hosts. I'm pretty much a VST/VSTi user, so I'll focus on those plug-in types, but the tricks I will suggest should work for any plug-in type.

I write this from experience. Recently, I've been working on a new version of an old song of mine, so I've spent a lot of time fiddling with VSTs trying to recapture the original sound and feel of the old song. And I will freely admit I have a lot more plug-ins than I have had time to fully test. This is the perfect scenario where BAD THINGS CAN, WILL, AND DID HAPPEN.

So What Happened?
Everything was fine when the last few times I worked on the song. Everything was running smoothly and I was making a lot of progress. Tonight, I loaded REAPER (and it auto-loaded the project), and instead of gracefully fading out from the splash window, REAPER crashed. I tried it again, it crashed again, but at a different part of the loading process. Third time's a charm, right? Wrong. Third time it loaded most of the way, the splash window got to the "Fading out" status message, and the entire computer froze. I had to resort to a hard reset (hold down the power button until it forces a shutdown). For the sake of full disclosure, I went through this same process (including the forced reboot!) TWICE before I decided I was being stupid.

Option 1: Go To A Backup
REAPER keeps backup copies of the last time you saved the project, so all is not lost. Find the file in the same directory as your project that has the same file name with a .RPP-bak extension. This is the backup made of the next-to-last saved version of your project. Rename it to something with an .RPP extension, and try loading it. If you're lucky, the bad plug in was not included in this version. More likely, it is still in there, and you crash again. If it doesn't crash, you are left with the problem of losing any changes you made since that save. Not ideal, but if the changes are minimal, this might be a viable option.

Option 2: Disable Suspect VSTs
If you have a pretty good idea of what new VST you added before the project went south, you can disable the suspect VST in one of two ways. One: Find the .dll file for that VST and rename it with a different file extension, like .dll_disabled. Two: Move the entire VST out of the path that REAPER looks at. This can be a good idea if you know exactly what you've been playing with, and can isolate the one "problem child".

Option 3: Kill Em All
In my situation, I had been working with so many VSTs, I had no clue what was in and was not in my project. So I instead renamed my root VST folder to another name, so REAPER wouldn't find any of my VSTs. When REAPER loads, it will not find any VSTs under the path it is looking at, so it will present you with a clear list of all plug ins it couldn't find. Copy down this list. Rename your VST folder back to its original name. Now you can try the same steps I outlined in "Option 2: Disable Suspect VSTs", since you now know every VST in your project. I can almost guarantee one of them doesn't play nicely. Move one out (or rename the .dll), try it. If the project works fine, then keep that VST separate/out of your toolkit. Newer versions of REAPER might work with it, so I'd recommend having a "doesn't work with REAPER yet" folder to drop all of these into.

Safe At Last
In an ideal world all VSTs would work with all hosts. I've never been "under the hood" on a VST host before, so I'm really not sure why some plug-ins are stable in one program and totally corrupt in others. But the fact remains that this is a reality. Since there are so many free/cheap VSTs out there, I know I don't really have too much to complain about if one doesn't work correctly in my DAW. For just about any type of plug in you want, you can probably find dozens of others out there that might work better.

If You Like Testing...
If you're the type of person that likes to have all the bugs worked out before you start, then you should test each and every plug in before you put it in your "real" toolkit. I have seen plug ins that crash on saving the project, crash on loading the project, crash on loading the plug in itself, as well as aberrant behavior when twiddling knobs in their UI, and even the occasional situation where using the same plug in multiple times in the same project will cause a meltdown. Frankly, there are so many parameters, I can't even imagine how rigorous the testing should be to declare a plug in "stable".

If You'd Rather Live on the Edge...
I'd rather spend my time playing than testing, so most of my "uh-oh" crashes come during real projects. So if you're like me, you'll need to get used to recovering quickly from a total project collapse. Once you step back, take a deep breath, and look for the unruly plug in, things will sort themselves out pretty quickly. I have also seen quite a few references in the forums to "pro grade" (i.e. expensive) plug ins that are also temperamental and will crash out your DAW, so the problem is definitely not just because you're using "the cheap stuff" like I am. These problems come with the territory, so get used to it.

Good Luck and Happy Bug Hunting!

Read the full post here!

Tuesday, October 21, 2008

Tutorial: Fixing a Noisy Line, Part 2

In Part 1 of this tutorial, we looked at gear and line investigation techniques to try to identify and/or minimize the problem. Here, in Part 2, we will focus on software solutions to handling a noise-laden signal.

REAPER Tools
While using REAPER, I have found 2 viable options to cleaning up a noisy audio track bundled with the program itself. ReaGate, and ReaFir. We will look at both of these options in turn. But first, we need a good way to see the sound. REAPER comes with a good tool for just this purpose: "JS: Analysis/gfxspectrograph". Add this into the end of your FX Chain, and you can use it to visually monitor what is coming across on your line. Totally black means it is totally silent. You can use this to gauge the effectiveness of your cleanup methods.

ReaGate
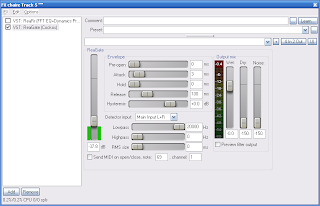
ReaGate is the bundled VST gate that comes with REAPER. A gate is essentially an automatic on-off switch for the audio. When the overall level drops below a certain threshold, the line is silenced. Gates usually have a bunch of other features, but you probably don’t need them forthis situation. To use ReaGate, add it to your FX Chain. It should be in the top slot, before any other plug-ins are used. This will keep the other plug-ins from amplifying the noise problem.

On the left of the ReaGate interface, you have a vertical slider that measures dB (decibels). The higher you move the slider, the higher the threshold for the gate to turn off the sound. Move the slider up until the background noise disappears. For my situation, a setting of –37.8 db was the lowest point where the noise dropped off. The green bars beside the threshold reflect the incoming signal. You can watch the Output mix meter on the right hand side to see when the Gate turns the signal off.

To Gate or Not To Gate
Gates are a tricky thing. On one hand, they stop the low-level noise from coming through very well. But when you have a gate in your chain, ANY sound below that threshold will be cut off as well. So if you’re letting a guitar ring out, when it hits that threshold your sound is completely dropped out. Depending on your style of music, this clipping could sound really strange and unwanted.

ReaFir
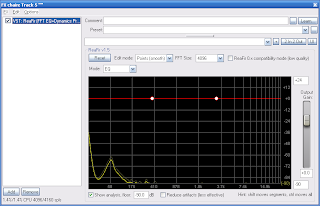
Another option is ReaFir, with is identified as a FFT EQ+Dynamics Processor. This is a tool with quite a few modes, including a gate. The gate in this doesn’t work quite the same, and is not as effective as the standalone ReaGate, in my opinion. Change the “Mode” to “Subtract”. There will be a new check box beside it labeled “Automatically build noise profile (enable during noise)”. This feature can be your new best friend. Make sure your equipment is connected and that the track is armed, with monitoring on. If you are combating line noise, turn your instrument’s volume to zero. If your trouble is from the instrument itself, silence it as best you can with the volume at your normal recording levels. (For guitars, you can loosely tie a bandanna or other soft cloth around the neck so it mutes the strings.) You should see the noise profile pulsing in the window.

FFT Size
This setting is essentially the size of the “chunk” of data it will evaluate at a time. A smaller number means it pushes your computer harder, because it is evaluating a lot of data. A larger setting is more economical on your system resources, but it also causes a lot of latency while monitoring. Personally, I usually set mine to 512, and it is a good balance between the two.

Build A Noise Profile
Mark the check box beside the “Build a noise profile” option, and let it run for a few seconds. A red line will begin to raise from the bottom where it is detecting noise. After it stops adding to its height, click on the check box again. That’s it. You have now build a noise profile that will be applied to the audio signal passing through this VST. This is basically a frequency-reactive gate, where a traditional gate is volume-reactive.

ReaFir or ReaGate?
Both ReaFir and ReaGate suffer from the same problem with sustained audio levels. Neither one is actually removing the individual components of the noise. They are both removing the audio when there is little or no instrument audio. If you have sustained sound coming through, like you would with a rhythm guitar passage, then the noise might be evident within the sound of the guitar itself. This is because gates are trimming the quiet levels noise, but they do nothing to actually stop the individual elements of the noise. I personally prefer ReaFir's "subtract" mode to a traditional gate, because the sound doesn't just stop when it reaches a certain point. Individual frequencies do, but not the entire sound. It sounds like a more natural fade than what you get from a gate crashing down on your sound.

Other Options
Depending on your noise source, you can also investigate notch filters to try to remove individual offensive frequencies, but these will impact your overall tone significantly. In my situation, I have such a wash of noise across a lot of frequencies that it is impossible for me to take this approach.

Do you have other software tricks that you’d like to recommend? Post a comment!

Read the full post here!

Saturday, October 18, 2008

Tutorial: Fixing a Noisy Line, Part 1

Something I’ve been combating lately in my recording is line and interface noise. As I mentioned recently, the Lightsnake USB interface I’ve been using worked OK with my acoustic, but once I started recording with an electric guitar, the noise is much more prominent. There are 2 ways to correct a noisy interface: 1) Buy Better Gear, or 2) Use the tools you have to try to minimize the audible noise coming through.

Since we are about frugality, we will assume that you don’t have the scratch right now to pick up a better interface. (I’m crossing my fingers and hoping a better interface box is under the Christmas tree, or at least some cash to buy it guilt-free.) That leaves us with the duct tape and chewing gum solution (i.e. a non-ideal solution) to cleaning up your audio.

Check Your Wires
The first thing to check when you’ve got excess noise coming on your input is to check the connections. Do you get pops and crackles when you touch the cables while connected? You might have a broken wire that is adding noise when it is flexed. It might be cracked shielding in the cable that might be picking up interference. Try to eliminate as many sources of noise. And remember, an incoming audio source MUST be plugged in to something when you’re testing. A cable end dangling on the floor usually will pick up a little charge from the air, perhaps a little extra hum from finger grime on the plug ends. Also, make sure the volume on the instrument is turned all the way down. This will help you isolate whether it is the instrument’s electronics causing the noise or something with the line/interface itself. If you identify a possible broken wire, try to swap it out and see if that helps.

Check Your Gear
If you have a clean line when the instrument’s volume is turned off, then you might have a problem in your gear itself, or interference causing problems with the gear. I have found that CRT monitors will cause a little extra hum on some lines. If you can, turn off the CRT and see if the sound goes away. If this is the case, then see if you can re-route things to keep the lines further from the monitor.

Another source can be some fluorescent light fixtures. I have used a couple that will generate a lightsaber-style hum on lines nearby. Turn off the lights and see if that helps.

If you can determine that the instrument is somehow at fault, but you can’t identify anything else reacting with it, then you may want to consider borrowing someone else’s similar instrument to see if it exhibits the same problem, or take the instrument to a qualified tech and see if there are modifications you can make to reduce the noise. (For guitars, these usually either means replacing pickups, switches, or at least having the wiring re-soldered to make better connections.)

Extra Hardware
Sometimes you can isolate that it is the instrument, but there’s nothing you can do to directly fix it. There are some line filters and power filters that might be able to help fix your signal. Frankly, most of those are out of my price range, especially for a “it MIGHT fix the problem” potential solution. If you have friends with this type of extra gear, by all means borrow their equipment and see if it cures your ills. If it does, start saving your loose change to buy one for yourself. Again, this falls under the “Buy Better Gear” option, which isn’t always a viable course to take.

It’s the Interface!
In my situation, I was able to isolate it to the Lightsnake itself. As I explained in my post “Eating My Own Words”, it became more evident with the electric guitar than with the acoustic, but it is definitely the interface itself, since I don’t get the same problem with other line or microphone inputs on the same computer.

Software Solutions
If your final verdict is like mine, then the garbage on the input can’t be directly avoided without buying new hardware, so you have to try to clean up the signal after it has been received. In Part 2 of this tutorial, we will look at software solutions to this problem.

Read the full post here!

Thursday, October 2, 2008

REAPER Tutorial 1 - Part 2

BEGINNER TUTORIAL

Part 2: Let’s twiddle some knobs…

In Part 1 of this tutorial, we walked through the basics of setting up a MIDI track with a stock VST and made a little tune, and extended it to loop. In Part 2, we are looking at what I refer to as “knob twiddling” – dynamically changing settings within your track structure in REAPER. This is a very small part of REAPER, but the end results of “knob twiddling” can really help your music “pop” for the listener. We will assume you have either the sample track you threw together in Part 1, or have a track loaded that you want to experiment with.

What Is It Called, Really?
The official term for the function is “Automation”. Automation allows you to control the settings of pretty much everything in your track either in a live mode or by actually drawing the settings as a line across your tracks themselves. When I say pretty much everything, I mean it. You can control volume (before and after your effects chain), pan (before and after your effects chain), as well as every control available in your virtual instruments and effects. This allows you to create exactly the same “knob twiddling” as would often happen during recording, mixing, or mastering phases of production.

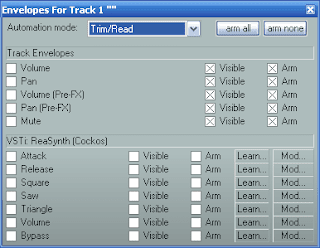
The control envelopes are grouped by what instrument or effect the control resides in, with the control’s proper name on the left. Check the box beside it to turn it on. If it is turned off, this entire envelope will be disabled. The “Visible” controls whether or not the automation line itself will be visible on top of the track display. The “Arm” check box controls whether or not this particular setting is ready to be recorded.

How To Get There From Here
To the left of the track display is a button that by default is labeled “trm” (This is showing that the envelope control is currently in “Trim/Read” mode. The label on the button will change depending on the mode it is set to). Clicking this will launch the automation control menu (with a title “Envelopes for Track #”). At the top of the display where is a drop-down box for “Automation mode”. We’ll get to what those options mean in a moment. The basic layout of the menu will expand as you add instruments and effects to your track, but the way you control them is identical.

The control envelopes are grouped by what instrument or effect the control resides in, with the control’s proper name on the left. Check the box beside it to turn it on. If it is turned off, this entire envelope will be disabled. The “Visible” controls whether or not the automation line itself will be visible on top of the track display. The “Arm” checkbox controls whether or not this particular setting is ready to be recorded.

Armed and Ready To Twiddle
Let’s try bouncing some tracks from left to right. Check the box to the left of “Pan”. Make sure “Visible” and “Arm” are both checked. (The normal default is to have them already checked for the Track Envelopes.) Change the Automation Mode to “Write”. Close the Envelope window.

You’ll notice that the pan control to the left of the track display has changed color, to a menacing red, and there is now a line across the track itself. Press the play button on the transport. As the track plays, click on the pan slider and start shifting it back and forth. The envelope line over the track will change itself to represent the values you are changing the slider to (For the pan control, pan full right is at bottom and pan left is at the top, so you can see the value.)

Re-open the Envelope window (the button is now labeled “wrt”) and change the Automation mode to “Read”. (“Read” will let you see the controls moving, “Read/Trim” will not move the controls). The pan control now is green, so you can see that it is going to move for you.

Hit play, and your track should now ping-pong back and forth in something reminiscent of Pink Floyd’s dangerous-to-listen-to-on-headphones “Interstellar Overdrive”.

Let’s Fix Something
Maybe you decide that everything is perfect except for a small part where you want to alter your pan envelope. Let’s fix it using “Touch” mode. Open the Envelope window (the button now is labeled “rd”), and change the Automation mode to “Touch”. Close it again. The pan control is now an odd yellow shade.

Hit play and get your mouse up to the pan control quickly. Let the envelope you already recorded play for a bit, and then grab it and twiddle it again for a little bit, and release it. This has now overwritten only that section of the envelope. As soon as you let go of the slider, the envelope will snap back to whatever was recorded before.

If you had used the “Latch” mode, it would have been exactly the same process, except when you let go of the control, the rest of the envelope would have written out the same setting that you left the control on.

Let’s Fix Something By Hand
Sometimes the adjustments you want to make are something you are struggling with changing live, as we just did. If you want to “knob twiddle” by hand/mouse, you simply need to check the box to the left of the setting you want to control, and make sure the “arm” and “visible” boxes beside it are both checked. It doesn’t matter what Automation mode you are in – hand/mouse editing still works. If you have points all over your line, as you have from our prior recording, you can grab a point on the line and drag it to its new value. It’s that simple.

If you are overwhelmed by envelope points, you can click on them to select them, right-click, and there are several delete options if you want to purge them. If you don’t have enough for what you’re doing, just double-click on the line and a new point will appear.


Changing Line Shapes
By default, all lines between points are straight lines. If you want to change this (and change the behavior of the envelope itself), you can right-click on a point, and select “Set point shape”, which will give a sub-menu of several options, including Square, Slow Start/End, Fast Start, Fast End, and Bezier. If you change this, it will modify the line from the current point to the next point only. This gives you the flexibility to make the individual segments of the envelope behave differently, so you can tweak for exactly the effect you want. You can also change the default to something other than “Linear” from the same right-click menu “Set envelope default point shape”.

Can’t I Just Type Them In?
Yes, you can. Create the points on the line by clicking where you want values, then right-click on the point and select “Set point value”. A menu will pop up that allows you to not only type in a value, but also select the Line Shape for the point. This is really useful when you are working with envelopes for controls that have only a few specific values that you want to adjust to.

What about external control?
You can also record input from external control surfaces and external interfaces. You need to have the control either directly mapped or use the “Learn…” control to assign a control knob or slider to that particular envelope.

In my experience with my M-Audio KeyStudio 25, I have had difficulties with the “Touch” mode, since it does not appear to “see” that I’ve stopped adjusting it. It effectively acts the same as “Latch” mode when I’m using “Touch” mode with that keyboard controller. I believe this is because it is not a “real” control surface, so REAPER and the keyboard are not working well together in that respect. When used by controlling by mouse on the on-screen controls, it works fine.

What do the Automation Modes Really Mean?
Here’s an at-a-glance at what the automation modes will do for you.

Trim/Read mode – In this mode, envelopes are used in playback, but the controls themselves don’t move (i.e. you don’t see the knobs and sliders moving around).

Read mode – In this mode, envelopes are used in playback, knobs and sliders will move, but it won’t save any changes you make to them, even if you’re fiddling with the knobs while it is playing.

Write mode – In this mode, all changes made to an armed control will be saved. This will completely overwrite anything that is already there. If you aren’t moving the control, it will record a flat automation envelope at the current setting.

Touch mode – In this mode, automation is recorded based on you manually altering a control in the UI, such as a volume knob, pan slider, or any setting on a virtual instrument or effect. Touch mode ONLY records new settings while you are touching the control. Once you have stopped “twiddling”, the control will revert to whatever was already drawn in that envelope.

Latch mode – Latch mode is similar to touch mode, except the setting does NOT revert to the previous envelope. So if you let go a volume control on a +3.0dB setting, it will continue to write that same setting until you stop recording.

Til Next Time
That wraps up part 2 of our beginner’s tutorial for REAPER. Stay tuned for more tutorials!

Read the full post here!

Thursday, September 11, 2008

REAPER Tutorial 1 - part 1

BEGINNER TUTORIAL

Part 1: Let’s make some pretty sounds...

We are kicking off our instructional series with this tutorial on how to start making music with REAPER. As you may have seen in my Gear Review of REAPER, it has one major benefit over other similarly-featured DAWs on the market: you can download the trial version which is not time-limited and not crippled like other trial versions. If you like it, you can register it for $50, which is less than the “LITE” versions of other major DAWs.

Since this tutorial is based on the idea that we’re starting from a basic system, this tutorial will begin with the assumption that you don’t have anything. Like I said, we’re starting at the ground and will begin building up from there.

Get started with REAPER
Download and install REAPER from http://reaper.fm. Follow all the instructions for setting it up and load it. If you’re using an unregistered copy, you’ll get a brief “Buy it” nag screen when you first open it. After 5 seconds, you can close it. If this is your first time loading REAPER, you’ll probably see the demo song “Making Me Nervous” in the display. We don’t care about that song right now. Select File->New Project to get into your own space.

Where Do I Start?
Now we have a blank workspace. Maybe I’m a little stuck in my ways, but the first thing I do with a new project is to do a File->Save Project As… and save the blank workspace. Why? Because once I start creating, I like to be able to hit the “Save” button without having to worry about what to call it.

As you can see in the picture, there are check boxes at the bottom of the window for “Create subdirectory for project” and “Copy all media into project directory”. These are great options to check, because it will help keep your individual projects/songs and all their related files in the same place. (Few things are as heart-breaking as destroying one song because you altered a sound file for another song.) Go ahead and name it “Tutorial 1” and hit Save.

Let’s Make a Track
Now that the housekeeping is out of the way, let’s add a new track. You can do this in a few ways, but the simplest is to double-click in the blank space on the left of the REAPER window.

Check the Musical Toy Box
Since we are going to be using only native REAPER resources right now, the next thing we need is to get a virtual instrument to play. Click on the button labeled “FX” on the new track you just created. This will bring up the interface displaying all the plug-ins you have available on your system. REAPER ships with a few, so we’ll stick to using those for the moment.

Pick your instrument
If you want to see which are instruments, click on the “Instruments” option, and the display will display only those plug-ins that are capable of creating their own sound.
Let’s select “VSTi: ReaSynth (Cockos)” by double-clicking on it. This will get rid of the selection window and present you with the FX Chain window.

Here is where you can change the settings for the plug-in, if you desire. For now, let’s leave this at default settings and close this window. You’ll notice that there is now a green light on the “FX” button you pressed. This lets you know there is a plug-in of some sort active on this track.

Let’s Write Some Music, finally!
On the overhead menu, select Insert->New MIDI Item. This will put a nice little “untitled MIDI event” box in your track. Double-click on it. This will launch the piano roll interface that represents the item you just double-clicked on.

If you click on the piano keys on the left, you can actually play the ReaSynth instrument we selected. You can scroll up and down the octaves by using the scroll bar in this window. The ReaSynth is so deep below about C1 that you can feel it, not hear it. So try scrolling up to around C3 or so for a higher tone. Now you can write your music in the grid on the right by clicking in the boxes. If you want to hold a note longer, you can stretch the rectangles out to represent the holding of those notes.

To audition the sound, there is a play button in the lower left. If you want to hear how it sounds as a loop, click on the circling arrow icon on the far right of that same control strip. This will allow the clip to loop infinitely.

Here’s what my semi-dissonant clip looks like. (Feel free to copy if you like.)

The Measure In the Roll
When you’re working in this screen, it’s important to keep an eye on the markers just above the piano roll grid. The numbers represent standard measures, and the heavy black line on the right identifies exactly where to end point of the clip is. This is your loop point/end of track. If you haven’t made it move, it should be right on the line with left edge of the “2” section. This means your clip is exactly one measure long. You can expand each clip to be as long as you need to fit your “musical phrase”. If you’ve bumped it out (by drawing notes past it), you can get it back to a single measure by deleting any notes that are in the way, and click-and-drag it back to where you want it.

Now that we have something beautiful music to work with, close the piano roll window. Your “untitled MIDI event” box now shows a thumbnail of the notes you entered on the piano roll.

Now Let's Get Loopy
Now if you want to make that one phrase be repeated in your song, you can click on the right side of the “untitled MIDI event” box, (in the lower half), and click-hold-drag it out as far as you want. At every point where the pattern is repeated, there will be an indent on the top and bottom of the section.

Now you can use the transport controls in the lower left to listen to your creation. Go ahead and save your work by either selecting File->Save Project or by clicking on the Floppy Disk icon in the upper right. (Third icon from the left, top row)

You’re reached the end of Part 1. In part 2, we’ll begin exploring the art of “knob twiddling” – how you can change settings on the fly within your music.

Read the full post here!