
I have recently come to terms with the fact that not all versions of Windows XP are equal. I have been blissfully unaware for the past couple years that Windows XP Media Center Edition is the ugly stepchild of the XP world. Yes, that's the OS I have been running. Somehow I have managed to keep myself on versions of Windows that are the least desirable for years. Before the Windows XP Media Center Edition, I had Windows ME. Oops.
So what does this have to do music? Simply put, it means everything. I have yet to find music production hardware or software that doesn't single out WinXP MCE as being not supported. It gives you a sinking feeling when you have a piece of software (or hardware) that runs on basically everything from Windows 95 to Vista, but doesn't run on this one version of XP.
What's So Special?
Windows XP MCE is a somewhat stripped version of Windows XP Pro, with the addition of the "Media Center" features. Those features are really only useful if you have your computer hooked to your main TV and feel like using your computer with a remote control. For the record, I am not one of those people. From what I understand, WinXP MCE lacks class-compliant audio drivers, which hurts some processes. It also is running their "Media Center" services, which I understand have the potential for clashes with audio processes.
The Straw That Broke...
For me, the last straw that made me decide I needed to fix my OS "problem" was when I changed my PC audio from using the onboard audio to a Sound Blaster Audigy 2 card. As soon as I switched sound card drivers, my MIDI keyboard quit being recognized. The PC told me it was there, but it didn't want to believe it was a valid MIDI interface! After some poking around, I found I could make it work again by disabling the Gameport/MIDI port that's on my Sound Blaster. I'm sorry - that makes no sense that I have to disable one MIDI port to make an unrelated USB MIDI device recognized. This was caused by XP MCE's audio compatibility problems.
What Can I Do?
You've got two options if you're running Windows XP MCE, as I see it: you can try to trick your system into behaving less like MCE, or you move to another OS. As far as tricking your system, there are forum posts out there that claim to give a list of registry keys to edit to disable the MCE features, which some people claim helps with SOME problems. But you are still left with the "it might work, it might not" status with every item you're drooling at in the latest Musician's Friend catalog or at your local music store.
Run Away...
I took the latter option: I have actually moved my home studio forward by downgrading my PC to use Windows XP Home Edition. Since I'm (ahem) frugal, I have an extra PC that was a hand-me-down from a friend who was going to throw it away. It had XP Home Edition installed. So I backed up everything from both systems onto CD and DVD, wiped the hard drives, and started over with fresh installations on both machines: XP Home Edition on my main computer, and XP MCE on the hand-me-down. It took a week to back up everything I needed, and a weekend to get the machines scrubbed and rebuilt, and a few more days to get all the apps in place and configured the way I want them.
Last Thoughts
If you're running XP MCE, don't let this scare you too badly. A lot of audio gear I was using worked fine. REAPER was rock solid. The Lightsnake, despite the interference, worked normally under XP MCE. But if you keep growing your studio based on XP MCE, be aware that you're rolling the dice each and every time you invest in new gear. But if you choose to move to another OS, I would advise XP Home or XP Pro, since Vista is also fairly well unsupported by a lot of companies at this point.
(Before I get the Mac contingent on me, yes, OS X is more stable for audio apps, but having to re-buy your apps on another OS is really counter-productive to being frugal.)
Read the full post here!
Thursday, October 30, 2008
Tuesday, October 21, 2008
Tutorial: Fixing a Noisy Line, Part 2
In Part 1 of this tutorial, we looked at gear and line investigation techniques to try to identify and/or minimize the problem. Here, in Part 2, we will focus on software solutions to handling a noise-laden signal.
REAPER Tools
While using REAPER, I have found 2 viable options to cleaning up a noisy audio track bundled with the program itself. ReaGate, and ReaFir. We will look at both of these options in turn. But first, we need a good way to see the sound. REAPER comes with a good tool for just this purpose: "JS: Analysis/gfxspectrograph". Add this into the end of your FX Chain, and you can use it to visually monitor what is coming across on your line. Totally black means it is totally silent. You can use this to gauge the effectiveness of your cleanup methods.
ReaGate
ReaGate is the bundled VST gate that comes with REAPER. A gate is essentially an automatic on-off switch for the audio. When the overall level drops below a certain threshold, the line is silenced. Gates usually have a bunch of other features, but you probably don’t need them forthis situation. To use ReaGate, add it to your FX Chain. It should be in the top slot, before any other plug-ins are used. This will keep the other plug-ins from amplifying the noise problem.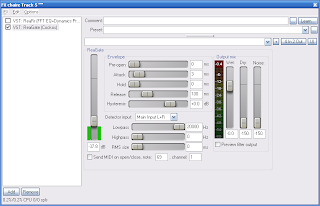
On the left of the ReaGate interface, you have a vertical slider that measures dB (decibels). The higher you move the slider, the higher the threshold for the gate to turn off the sound. Move the slider up until the background noise disappears. For my situation, a setting of –37.8 db was the lowest point where the noise dropped off. The green bars beside the threshold reflect the incoming signal. You can watch the Output mix meter on the right hand side to see when the Gate turns the signal off.
To Gate or Not To Gate
Gates are a tricky thing. On one hand, they stop the low-level noise from coming through very well. But when you have a gate in your chain, ANY sound below that threshold will be cut off as well. So if you’re letting a guitar ring out, when it hits that threshold your sound is completely dropped out. Depending on your style of music, this clipping could sound really strange and unwanted.
ReaFir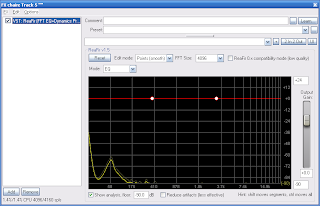
Another option is ReaFir, with is identified as a FFT EQ+Dynamics Processor. This is a tool with quite a few modes, including a gate. The gate in this doesn’t work quite the same, and is not as effective as the standalone ReaGate, in my opinion. Change the “Mode” to “Subtract”. There will be a new check box beside it labeled “Automatically build noise profile (enable during noise)”. This feature can be your new best friend. Make sure your equipment is connected and that the track is armed, with monitoring on. If you are combating line noise, turn your instrument’s volume to zero. If your trouble is from the instrument itself, silence it as best you can with the volume at your normal recording levels. (For guitars, you can loosely tie a bandanna or other soft cloth around the neck so it mutes the strings.) You should see the noise profile pulsing in the window.
FFT Size
This setting is essentially the size of the “chunk” of data it will evaluate at a time. A smaller number means it pushes your computer harder, because it is evaluating a lot of data. A larger setting is more economical on your system resources, but it also causes a lot of latency while monitoring. Personally, I usually set mine to 512, and it is a good balance between the two.
Build A Noise Profile
Mark the check box beside the “Build a noise profile” option, and let it run for a few seconds. A red line will begin to raise from the bottom where it is detecting noise. After it stops adding to its height, click on the check box again. That’s it. You have now build a noise profile that will be applied to the audio signal passing through this VST. This is basically a frequency-reactive gate, where a traditional gate is volume-reactive.
ReaFir or ReaGate?
Both ReaFir and ReaGate suffer from the same problem with sustained audio levels. Neither one is actually removing the individual components of the noise. They are both removing the audio when there is little or no instrument audio. If you have sustained sound coming through, like you would with a rhythm guitar passage, then the noise might be evident within the sound of the guitar itself. This is because gates are trimming the quiet levels noise, but they do nothing to actually stop the individual elements of the noise. I personally prefer ReaFir's "subtract" mode to a traditional gate, because the sound doesn't just stop when it reaches a certain point. Individual frequencies do, but not the entire sound. It sounds like a more natural fade than what you get from a gate crashing down on your sound.
Other Options
Depending on your noise source, you can also investigate notch filters to try to remove individual offensive frequencies, but these will impact your overall tone significantly. In my situation, I have such a wash of noise across a lot of frequencies that it is impossible for me to take this approach.
Do you have other software tricks that you’d like to recommend? Post a comment!
Read the full post here!
REAPER Tools
While using REAPER, I have found 2 viable options to cleaning up a noisy audio track bundled with the program itself. ReaGate, and ReaFir. We will look at both of these options in turn. But first, we need a good way to see the sound. REAPER comes with a good tool for just this purpose: "JS: Analysis/gfxspectrograph". Add this into the end of your FX Chain, and you can use it to visually monitor what is coming across on your line. Totally black means it is totally silent. You can use this to gauge the effectiveness of your cleanup methods.
ReaGate
ReaGate is the bundled VST gate that comes with REAPER. A gate is essentially an automatic on-off switch for the audio. When the overall level drops below a certain threshold, the line is silenced. Gates usually have a bunch of other features, but you probably don’t need them forthis situation. To use ReaGate, add it to your FX Chain. It should be in the top slot, before any other plug-ins are used. This will keep the other plug-ins from amplifying the noise problem.

On the left of the ReaGate interface, you have a vertical slider that measures dB (decibels). The higher you move the slider, the higher the threshold for the gate to turn off the sound. Move the slider up until the background noise disappears. For my situation, a setting of –37.8 db was the lowest point where the noise dropped off. The green bars beside the threshold reflect the incoming signal. You can watch the Output mix meter on the right hand side to see when the Gate turns the signal off.
To Gate or Not To Gate
Gates are a tricky thing. On one hand, they stop the low-level noise from coming through very well. But when you have a gate in your chain, ANY sound below that threshold will be cut off as well. So if you’re letting a guitar ring out, when it hits that threshold your sound is completely dropped out. Depending on your style of music, this clipping could sound really strange and unwanted.
ReaFir

Another option is ReaFir, with is identified as a FFT EQ+Dynamics Processor. This is a tool with quite a few modes, including a gate. The gate in this doesn’t work quite the same, and is not as effective as the standalone ReaGate, in my opinion. Change the “Mode” to “Subtract”. There will be a new check box beside it labeled “Automatically build noise profile (enable during noise)”. This feature can be your new best friend. Make sure your equipment is connected and that the track is armed, with monitoring on. If you are combating line noise, turn your instrument’s volume to zero. If your trouble is from the instrument itself, silence it as best you can with the volume at your normal recording levels. (For guitars, you can loosely tie a bandanna or other soft cloth around the neck so it mutes the strings.) You should see the noise profile pulsing in the window.
FFT Size
This setting is essentially the size of the “chunk” of data it will evaluate at a time. A smaller number means it pushes your computer harder, because it is evaluating a lot of data. A larger setting is more economical on your system resources, but it also causes a lot of latency while monitoring. Personally, I usually set mine to 512, and it is a good balance between the two.
Build A Noise Profile
Mark the check box beside the “Build a noise profile” option, and let it run for a few seconds. A red line will begin to raise from the bottom where it is detecting noise. After it stops adding to its height, click on the check box again. That’s it. You have now build a noise profile that will be applied to the audio signal passing through this VST. This is basically a frequency-reactive gate, where a traditional gate is volume-reactive.
ReaFir or ReaGate?
Both ReaFir and ReaGate suffer from the same problem with sustained audio levels. Neither one is actually removing the individual components of the noise. They are both removing the audio when there is little or no instrument audio. If you have sustained sound coming through, like you would with a rhythm guitar passage, then the noise might be evident within the sound of the guitar itself. This is because gates are trimming the quiet levels noise, but they do nothing to actually stop the individual elements of the noise. I personally prefer ReaFir's "subtract" mode to a traditional gate, because the sound doesn't just stop when it reaches a certain point. Individual frequencies do, but not the entire sound. It sounds like a more natural fade than what you get from a gate crashing down on your sound.
Other Options
Depending on your noise source, you can also investigate notch filters to try to remove individual offensive frequencies, but these will impact your overall tone significantly. In my situation, I have such a wash of noise across a lot of frequencies that it is impossible for me to take this approach.
Do you have other software tricks that you’d like to recommend? Post a comment!
Read the full post here!
Saturday, October 18, 2008
Tutorial: Fixing a Noisy Line, Part 1
Something I’ve been combating lately in my recording is line and interface noise. As I mentioned recently, the Lightsnake USB interface I’ve been using worked OK with my acoustic, but once I started recording with an electric guitar, the noise is much more prominent. There are 2 ways to correct a noisy interface: 1) Buy Better Gear, or 2) Use the tools you have to try to minimize the audible noise coming through.
Since we are about frugality, we will assume that you don’t have the scratch right now to pick up a better interface. (I’m crossing my fingers and hoping a better interface box is under the Christmas tree, or at least some cash to buy it guilt-free.) That leaves us with the duct tape and chewing gum solution (i.e. a non-ideal solution) to cleaning up your audio.
Check Your Wires
The first thing to check when you’ve got excess noise coming on your input is to check the connections. Do you get pops and crackles when you touch the cables while connected? You might have a broken wire that is adding noise when it is flexed. It might be cracked shielding in the cable that might be picking up interference. Try to eliminate as many sources of noise. And remember, an incoming audio source MUST be plugged in to something when you’re testing. A cable end dangling on the floor usually will pick up a little charge from the air, perhaps a little extra hum from finger grime on the plug ends. Also, make sure the volume on the instrument is turned all the way down. This will help you isolate whether it is the instrument’s electronics causing the noise or something with the line/interface itself. If you identify a possible broken wire, try to swap it out and see if that helps.
Check Your Gear
If you have a clean line when the instrument’s volume is turned off, then you might have a problem in your gear itself, or interference causing problems with the gear. I have found that CRT monitors will cause a little extra hum on some lines. If you can, turn off the CRT and see if the sound goes away. If this is the case, then see if you can re-route things to keep the lines further from the monitor.
Another source can be some fluorescent light fixtures. I have used a couple that will generate a lightsaber-style hum on lines nearby. Turn off the lights and see if that helps.
If you can determine that the instrument is somehow at fault, but you can’t identify anything else reacting with it, then you may want to consider borrowing someone else’s similar instrument to see if it exhibits the same problem, or take the instrument to a qualified tech and see if there are modifications you can make to reduce the noise. (For guitars, these usually either means replacing pickups, switches, or at least having the wiring re-soldered to make better connections.)
Extra Hardware
Sometimes you can isolate that it is the instrument, but there’s nothing you can do to directly fix it. There are some line filters and power filters that might be able to help fix your signal. Frankly, most of those are out of my price range, especially for a “it MIGHT fix the problem” potential solution. If you have friends with this type of extra gear, by all means borrow their equipment and see if it cures your ills. If it does, start saving your loose change to buy one for yourself. Again, this falls under the “Buy Better Gear” option, which isn’t always a viable course to take.
It’s the Interface!
In my situation, I was able to isolate it to the Lightsnake itself. As I explained in my post “Eating My Own Words”, it became more evident with the electric guitar than with the acoustic, but it is definitely the interface itself, since I don’t get the same problem with other line or microphone inputs on the same computer.
Software Solutions
If your final verdict is like mine, then the garbage on the input can’t be directly avoided without buying new hardware, so you have to try to clean up the signal after it has been received. In Part 2 of this tutorial, we will look at software solutions to this problem.
Read the full post here!
Sunday, October 12, 2008
Eating My Own Words - Lightsnake Review Updated
Well, I'll be the first to admit that having to eat your own words is not too tasty, but sometimes it is exactly what you need to do.
Recently I posted a review of the Lightsnake USB Instrument Cable. In that review, I gave it decent marks in my experience - no errant line noises like some people claimed to have heard (I even parroted the corporate "must be a bad cable" approach to people's problems.) I have once again proven to myself that you will get different results with different gear. At the time I wrote that review, I had only one guitar to try with it, a Daisy Rock Wildwood Electric/Acoustic Guitar. So my review reflect my experience with it at that time. The extra environmental noise normal with an acoustic guitar in a non-soundproofed environment caused me to always put a gate in the effects chain to clean it up. The natural fullness of sound from the acoustic guitar came across nicely and I was satisfied that the (gated) recorded material was fairly accurate to the original sound.
I recently picked up an Epiphone SG Special, which is an admittedly low-end electric guitar. Of course, I plugged it into the Lightsnake. My first reaction was "what in the heck is that racket?" The racket was, unfortunately, an electric pulsing noise over the monitors I never noticed previously (thanks to the gate). Okay, fine. I put a gate in the chain, and did some trial recording with the SG. The gate worked to take off the noise in the silent sections. But as soon as you hit anything loud and sustained (like a chord progression), the noise was embedded in the louder sections. I also tried using the ReaFIR VST in Subtraction mode to build a noise profile. Again, it works fine for trimming the noise off in silent or very light, quick notes, but if you have any continuous playing, you can hear the noise interlaced with your guitar sound.
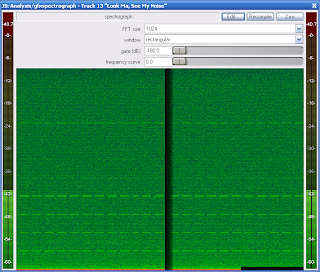 I took a shot of a spectrograph of the line noise with the Lightsnake plugged into the SG with the volume knob set to zero. What you see is a wash of noise, with a lot of other structured pulses embedded in it. I checked old recordings from the Acoustic - I see the same "pulse signature" in the signal. I think the reason I never noticed it with the Daisy Rock on recording is that the acoustic is naturally a very full sound, so the noise was actually getting lost in the sound of the acoustic. Since the electric doesn't have the same wide-spectrum wash as the acoustic, the noisy cable is laid bare for all to see and hear.
So here I sit, eating my own words about my value shopping, and have to say I spent my money poorly. (However, I have been using it for 6 months or so before I came to that conclusion, so maybe it wasn't a total waste.) I heartily recommend saving your pennies (as I am) and save up for a more "pro" box. I'm currently looking at the Line 6 TonePort series, since it is more of a name brand with a lot more positive reviews.
Since this is the net, we can rewrite history, so I plan to. I have added the core of this post into my original Lightsnake review, so folks stumbling across it will be wiser that I was when I first wrote it.
Read the full post here!
Thursday, October 9, 2008
Site Review: HowToTuneAGuitar.org
If you've ever looked for instructional guitar videos online, you'll find an ugly pile of subscription sites and "pay us and you'll play like Clapton in thirty days" claims that you know are extremely bloated. I've looked at a few sites that have appeared to be good, but I'm not going to spend the money to get into the subscription areas. It seems like it is a misguided use of my money. Recently I have come across a site that is playing by a (slightly) different set of rules: http://www.howtotuneaguitar.org.
Why On-line Tuning?
The name of the site makes it seem like a one-trick pony, but it actually has more goodness buried inside. First, let's talk about the main focus: Tuning a guitar. Yes, I know most guitarists have a digital tuner of their own, but when you're working at your desktop studio, sometimes it is easier to use online tools than to 1) find your tuner, 2) find fresh battery for the tuner, 3) unplug your rig to connect the tuner, 4) tune it, before 5) putting everything back the way it was, and you've forgotten what you were going to play.
Tune Me
The online tuner is a six note widget that allows you to turn on each note, and it will repeat a clean guitar tone of that note until you turn that one off. Then you can tune by ear to the tone it plays. (If you're really interested in wasting time, you can play a rudimentary tune on it, as long as you are only playing the open strings - but that's goofing off, isn't it?) What makes this so helpful beyond a pocket tuner is all of the alternate tunings. There are a ton of alternates both familiar (Drop D, Half Step Down, etc) and a lot that are completely alien to me (I have no idea WHAT a Buzzard tuning is, but I now know it tunes to C, F, C, G, A#, F). One weakness to the tuner is that when it is playing tuning notes for alternate forms of instrument, it uses the same tones. For example, the Dobro setting still sounds like a regular guitar. But this can be overlooked for two main reasons: It is a free tool, and I don't actually own any of the unusual instruments like a Dobro.
Another bonus is the tuner widget. It is a mini-version of the tuner on the site, but limited to standard tuning only. I have embedded it in my sidebar (Called "Tune-O-Matic"), if you want to play with it.
Tutorials
In addition to the tuner, the site also features a decent library of guitar lessons. These do not appear to be custom videos for the site, but rather the results of extensive YouTube digging. As a result, they are at various levels of helpfulness, and the "teachers" are at various skill levels themselves. But they are pretty good. (I particularly like the way the teaching video for "Keep On Rockin' In The Free World" includes on-screen diagrams and read-along fingering and pattern charts overlaid over the video). Even though these are all YouTube embedded videos, the site provides a good filter for pre-screened content, so you don't have to waste time getting lost in the vacuum of YouTube, where people have been known to get lost for days.
Chords and Scales
They also another widget called "Chordbot", which gives you 4 fingerings for just about every possible chord you've ever heard of, in a nice visual of the fretboard in a very readable format. If learning the various scales is more your interest, there are also multiple fingerings presented for every major and minor scale, again in a nicely presented format (though as individual pages for each scale, unlike the integrated "Chordbot").
Reviews
There are a few "reviews" on the site as well, primarily of teaching tools and lesson software. I'm not too interested in buying lessons, as I mentioned earlier, but I took a closer look anyway. It didn't take long to realize that the "reviews" section is really just an affiliate link farm, with all the ones I checked linking to pages that were built in exactly the same endless one-page-infomercial format common with "get rick quick" e-book sites. So there isn't anything that I would consider a "review", and I'd recommend pretending that section doesn't exist.
Other Stuff
Yes, there is actually a section called "Other Stuff", which is a infrequent blog of guitar related topics. There seems to be some level of ranting against Guitar Hero, but that's to be expected from "normal" guitarists. Not a lot of action on the blog, so probably not something to be on the top of your feed reader (if at all).
The Good, The Bad, The Ugly
HowToTuneAGuitar.org is good at their core proposition: tuning your guitar. They are also good with their collection of YouTube-scavenged Guitar lessons. And yes, the Chordbot and the scales are worth your while, too. The rest? Blatant ads that take up more space than their original content. Go for the tuner, stay for the Chordbot and the lessons. Skip the rest.
Read the full post here!
Sunday, October 5, 2008
Remix Other People's Music
Previously, I talked about rewriting other people's songs in a different style (see Musical Re-Visioning) as a tool to break out of your box. Another way to break out of the doldrums and get something new going is to remix other people's music.
In the early 90's, I used to do this without really thinking of it as remixing. I would record sound bites on a tape deck, jack it into the Perfect Sound sampler on my Amiga 500, and rip small passages that I later would use in my own "new mixes". Sure, they were gritty, 8-bit samples with WAY too much background music, but they helped stretch my imagination because I was playing with full musical passages, lyrics, and a musical signature that wasn't my own.
Like other techniques I have mentioned here before, remixing is an interesting way to get your hands dirty and come away with not only a new appreciation for the complexity (or simplicity) of the artist's work, but also with more knowledge of how they assembled their beats, how they took simple passages and made a really memorable song, etc. You increase your mental musical database with these snippets that will influence your later original work.
Where To Start
Now with the free-for-all of the web and the change in moods from some artists, you can take this a step further than my early remixing attempts, without all the suffering through poor quality rips of passages and the omnipresent "other music" behind the clips you really want. We are now in a climate where some artists are releasing the bare bones bits-and-pieces of their songs with the intention or creating remixes. A couple artists that are worth noting doing exactly this (separately) are Jay-Z and Nine Inch Nails.
Jay-Z released an acapella version of The Black Album , which immediately encouraged fans and remixers to use his tracks in their own mixes. (The best of the remixes of this has got to be Danger Mouse's "Grey Album", which remixes Jay-Z with The Beatles' "The White Album". It has been banned from official release, which means you can find it all over the web, but can't actually buy it. Find it. Enjoy it.) One downside is that Jay-Z released the acapella version as another commercial album, so there's no free ride here.
Nine Inch Nails has taken another approach, by releasing all the source audio tracks from quite a few of their songs for free download on their site. These are in a variety of formats, including GarageBand, Ableton Live, as well as raw WAV files for people using other programs. They also released the source tracks for EVERY SONG from the album "Year Zero " on their followup remix album "Y34RZ3R0R3M1X3D
 " as enhanced CD content. More recently, they released the source tracks to every song on their latest album "The Slip" on their site. To take it even a step further, they have provided an online community to share your remixes of their material online and to listen to other people's remixes as well. You can find the Nine Inch Nails remix community at http://remix.nin.com.
Drop me a line or post a comment if you have found any other worthwhile artists giving away source material for remixes. It is always fun to see how established artists crafted their songs (and how easily we can take their visions in other directions).
Read the full post here!
In the early 90's, I used to do this without really thinking of it as remixing. I would record sound bites on a tape deck, jack it into the Perfect Sound sampler on my Amiga 500, and rip small passages that I later would use in my own "new mixes". Sure, they were gritty, 8-bit samples with WAY too much background music, but they helped stretch my imagination because I was playing with full musical passages, lyrics, and a musical signature that wasn't my own.
Like other techniques I have mentioned here before, remixing is an interesting way to get your hands dirty and come away with not only a new appreciation for the complexity (or simplicity) of the artist's work, but also with more knowledge of how they assembled their beats, how they took simple passages and made a really memorable song, etc. You increase your mental musical database with these snippets that will influence your later original work.
Where To Start
Now with the free-for-all of the web and the change in moods from some artists, you can take this a step further than my early remixing attempts, without all the suffering through poor quality rips of passages and the omnipresent "other music" behind the clips you really want. We are now in a climate where some artists are releasing the bare bones bits-and-pieces of their songs with the intention or creating remixes. A couple artists that are worth noting doing exactly this (separately) are Jay-Z and Nine Inch Nails.
Jay-Z released an acapella version of The Black Album
Nine Inch Nails has taken another approach, by releasing all the source audio tracks from quite a few of their songs for free download on their site. These are in a variety of formats, including GarageBand, Ableton Live, as well as raw WAV files for people using other programs. They also released the source tracks for EVERY SONG from the album "Year Zero
Drop me a line or post a comment if you have found any other worthwhile artists giving away source material for remixes. It is always fun to see how established artists crafted their songs (and how easily we can take their visions in other directions).
Read the full post here!
Thursday, October 2, 2008
REAPER Tutorial 1 - Part 2
BEGINNER TUTORIAL
Part 2: Let’s twiddle some knobs…
In Part 1 of this tutorial, we walked through the basics of setting up a MIDI track with a stock VST and made a little tune, and extended it to loop. In Part 2, we are looking at what I refer to as “knob twiddling” – dynamically changing settings within your track structure in REAPER. This is a very small part of REAPER, but the end results of “knob twiddling” can really help your music “pop” for the listener. We will assume you have either the sample track you threw together in Part 1, or have a track loaded that you want to experiment with.
What Is It Called, Really?
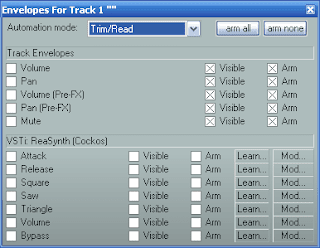
The official term for the function is “Automation”. Automation allows you to control the settings of pretty much everything in your track either in a live mode or by actually drawing the settings as a line across your tracks themselves. When I say pretty much everything, I mean it. You can control volume (before and after your effects chain), pan (before and after your effects chain), as well as every control available in your virtual instruments and effects. This allows you to create exactly the same “knob twiddling” as would often happen during recording, mixing, or mastering phases of production.
The control envelopes are grouped by what instrument or effect the control resides in, with the control’s proper name on the left. Check the box beside it to turn it on. If it is turned off, this entire envelope will be disabled. The “Visible” controls whether or not the automation line itself will be visible on top of the track display. The “Arm” check box controls whether or not this particular setting is ready to be recorded.
How To Get There From Here
To the left of the track display is a button that by default is labeled “trm” (This is showing that the envelope control is currently in “Trim/Read” mode. The label on the button will change depending on the mode it is set to). Clicking this will launch the automation control menu (with a title “Envelopes for Track #”). At the top of the display where is a drop-down box for “Automation mode”. We’ll get to what those options mean in a moment. The basic layout of the menu will expand as you add instruments and effects to your track, but the way you control them is identical.
The control envelopes are grouped by what instrument or effect the control resides in, with the control’s proper name on the left. Check the box beside it to turn it on. If it is turned off, this entire envelope will be disabled. The “Visible” controls whether or not the automation line itself will be visible on top of the track display. The “Arm” checkbox controls whether or not this particular setting is ready to be recorded.
Armed and Ready To Twiddle
Let’s try bouncing some tracks from left to right. Check the box to the left of “Pan”. Make sure “Visible” and “Arm” are both checked. (The normal default is to have them already checked for the Track Envelopes.) Change the Automation Mode to “Write”. Close the Envelope window.
You’ll notice that the pan control to the left of the track display has changed color, to a menacing red, and there is now a line across the track itself. Press the play button on the transport. As the track plays, click on the pan slider and start shifting it back and forth. The envelope line over the track will change itself to represent the values you are changing the slider to (For the pan control, pan full right is at bottom and pan left is at the top, so you can see the value.)
Re-open the Envelope window (the button is now labeled “wrt”) and change the Automation mode to “Read”. (“Read” will let you see the controls moving, “Read/Trim” will not move the controls). The pan control now is green, so you can see that it is going to move for you.
Hit play, and your track should now ping-pong back and forth in something reminiscent of Pink Floyd’s dangerous-to-listen-to-on-headphones “Interstellar Overdrive”.
Let’s Fix Something
Maybe you decide that everything is perfect except for a small part where you want to alter your pan envelope. Let’s fix it using “Touch” mode. Open the Envelope window (the button now is labeled “rd”), and change the Automation mode to “Touch”. Close it again. The pan control is now an odd yellow shade.
Hit play and get your mouse up to the pan control quickly. Let the envelope you already recorded play for a bit, and then grab it and twiddle it again for a little bit, and release it. This has now overwritten only that section of the envelope. As soon as you let go of the slider, the envelope will snap back to whatever was recorded before.
If you had used the “Latch” mode, it would have been exactly the same process, except when you let go of the control, the rest of the envelope would have written out the same setting that you left the control on.
Let’s Fix Something By Hand
Sometimes the adjustments you want to make are something you are struggling with changing live, as we just did. If you want to “knob twiddle” by hand/mouse, you simply need to check the box to the left of the setting you want to control, and make sure the “arm” and “visible” boxes beside it are both checked. It doesn’t matter what Automation mode you are in – hand/mouse editing still works. If you have points all over your line, as you have from our prior recording, you can grab a point on the line and drag it to its new value. It’s that simple.
If you are overwhelmed by envelope points, you can click on them to select them, right-click, and there are several delete options if you want to purge them. If you don’t have enough for what you’re doing, just double-click on the line and a new point will appear.
Changing Line Shapes
By default, all lines between points are straight lines. If you want to change this (and change the behavior of the envelope itself), you can right-click on a point, and select “Set point shape”, which will give a sub-menu of several options, including Square, Slow Start/End, Fast Start, Fast End, and Bezier. If you change this, it will modify the line from the current point to the next point only. This gives you the flexibility to make the individual segments of the envelope behave differently, so you can tweak for exactly the effect you want. You can also change the default to something other than “Linear” from the same right-click menu “Set envelope default point shape”.
Can’t I Just Type Them In?
Yes, you can. Create the points on the line by clicking where you want values, then right-click on the point and select “Set point value”. A menu will pop up that allows you to not only type in a value, but also select the Line Shape for the point. This is really useful when you are working with envelopes for controls that have only a few specific values that you want to adjust to.
What about external control?
You can also record input from external control surfaces and external interfaces. You need to have the control either directly mapped or use the “Learn…” control to assign a control knob or slider to that particular envelope.
In my experience with my M-Audio KeyStudio 25, I have had difficulties with the “Touch” mode, since it does not appear to “see” that I’ve stopped adjusting it. It effectively acts the same as “Latch” mode when I’m using “Touch” mode with that keyboard controller. I believe this is because it is not a “real” control surface, so REAPER and the keyboard are not working well together in that respect. When used by controlling by mouse on the on-screen controls, it works fine.
What do the Automation Modes Really Mean?
Here’s an at-a-glance at what the automation modes will do for you.
Trim/Read mode – In this mode, envelopes are used in playback, but the controls themselves don’t move (i.e. you don’t see the knobs and sliders moving around).
Read mode – In this mode, envelopes are used in playback, knobs and sliders will move, but it won’t save any changes you make to them, even if you’re fiddling with the knobs while it is playing.
Write mode – In this mode, all changes made to an armed control will be saved. This will completely overwrite anything that is already there. If you aren’t moving the control, it will record a flat automation envelope at the current setting.
Touch mode – In this mode, automation is recorded based on you manually altering a control in the UI, such as a volume knob, pan slider, or any setting on a virtual instrument or effect. Touch mode ONLY records new settings while you are touching the control. Once you have stopped “twiddling”, the control will revert to whatever was already drawn in that envelope.
Latch mode – Latch mode is similar to touch mode, except the setting does NOT revert to the previous envelope. So if you let go a volume control on a +3.0dB setting, it will continue to write that same setting until you stop recording.
Til Next Time
That wraps up part 2 of our beginner’s tutorial for REAPER. Stay tuned for more tutorials!
Read the full post here!
Part 2: Let’s twiddle some knobs…
In Part 1 of this tutorial, we walked through the basics of setting up a MIDI track with a stock VST and made a little tune, and extended it to loop. In Part 2, we are looking at what I refer to as “knob twiddling” – dynamically changing settings within your track structure in REAPER. This is a very small part of REAPER, but the end results of “knob twiddling” can really help your music “pop” for the listener. We will assume you have either the sample track you threw together in Part 1, or have a track loaded that you want to experiment with.
What Is It Called, Really?
The official term for the function is “Automation”. Automation allows you to control the settings of pretty much everything in your track either in a live mode or by actually drawing the settings as a line across your tracks themselves. When I say pretty much everything, I mean it. You can control volume (before and after your effects chain), pan (before and after your effects chain), as well as every control available in your virtual instruments and effects. This allows you to create exactly the same “knob twiddling” as would often happen during recording, mixing, or mastering phases of production.
The control envelopes are grouped by what instrument or effect the control resides in, with the control’s proper name on the left. Check the box beside it to turn it on. If it is turned off, this entire envelope will be disabled. The “Visible” controls whether or not the automation line itself will be visible on top of the track display. The “Arm” check box controls whether or not this particular setting is ready to be recorded.
How To Get There From Here
To the left of the track display is a button that by default is labeled “trm” (This is showing that the envelope control is currently in “Trim/Read” mode. The label on the button will change depending on the mode it is set to). Clicking this will launch the automation control menu (with a title “Envelopes for Track #”). At the top of the display where is a drop-down box for “Automation mode”. We’ll get to what those options mean in a moment. The basic layout of the menu will expand as you add instruments and effects to your track, but the way you control them is identical.
The control envelopes are grouped by what instrument or effect the control resides in, with the control’s proper name on the left. Check the box beside it to turn it on. If it is turned off, this entire envelope will be disabled. The “Visible” controls whether or not the automation line itself will be visible on top of the track display. The “Arm” checkbox controls whether or not this particular setting is ready to be recorded.

Armed and Ready To Twiddle
Let’s try bouncing some tracks from left to right. Check the box to the left of “Pan”. Make sure “Visible” and “Arm” are both checked. (The normal default is to have them already checked for the Track Envelopes.) Change the Automation Mode to “Write”. Close the Envelope window.
You’ll notice that the pan control to the left of the track display has changed color, to a menacing red, and there is now a line across the track itself. Press the play button on the transport. As the track plays, click on the pan slider and start shifting it back and forth. The envelope line over the track will change itself to represent the values you are changing the slider to (For the pan control, pan full right is at bottom and pan left is at the top, so you can see the value.)
Re-open the Envelope window (the button is now labeled “wrt”) and change the Automation mode to “Read”. (“Read” will let you see the controls moving, “Read/Trim” will not move the controls). The pan control now is green, so you can see that it is going to move for you.
Hit play, and your track should now ping-pong back and forth in something reminiscent of Pink Floyd’s dangerous-to-listen-to-on-headphones “Interstellar Overdrive”.
Let’s Fix Something
Maybe you decide that everything is perfect except for a small part where you want to alter your pan envelope. Let’s fix it using “Touch” mode. Open the Envelope window (the button now is labeled “rd”), and change the Automation mode to “Touch”. Close it again. The pan control is now an odd yellow shade.
Hit play and get your mouse up to the pan control quickly. Let the envelope you already recorded play for a bit, and then grab it and twiddle it again for a little bit, and release it. This has now overwritten only that section of the envelope. As soon as you let go of the slider, the envelope will snap back to whatever was recorded before.
If you had used the “Latch” mode, it would have been exactly the same process, except when you let go of the control, the rest of the envelope would have written out the same setting that you left the control on.
Let’s Fix Something By Hand
Sometimes the adjustments you want to make are something you are struggling with changing live, as we just did. If you want to “knob twiddle” by hand/mouse, you simply need to check the box to the left of the setting you want to control, and make sure the “arm” and “visible” boxes beside it are both checked. It doesn’t matter what Automation mode you are in – hand/mouse editing still works. If you have points all over your line, as you have from our prior recording, you can grab a point on the line and drag it to its new value. It’s that simple.
If you are overwhelmed by envelope points, you can click on them to select them, right-click, and there are several delete options if you want to purge them. If you don’t have enough for what you’re doing, just double-click on the line and a new point will appear.
Changing Line Shapes
By default, all lines between points are straight lines. If you want to change this (and change the behavior of the envelope itself), you can right-click on a point, and select “Set point shape”, which will give a sub-menu of several options, including Square, Slow Start/End, Fast Start, Fast End, and Bezier. If you change this, it will modify the line from the current point to the next point only. This gives you the flexibility to make the individual segments of the envelope behave differently, so you can tweak for exactly the effect you want. You can also change the default to something other than “Linear” from the same right-click menu “Set envelope default point shape”.
Can’t I Just Type Them In?
Yes, you can. Create the points on the line by clicking where you want values, then right-click on the point and select “Set point value”. A menu will pop up that allows you to not only type in a value, but also select the Line Shape for the point. This is really useful when you are working with envelopes for controls that have only a few specific values that you want to adjust to.
What about external control?
You can also record input from external control surfaces and external interfaces. You need to have the control either directly mapped or use the “Learn…” control to assign a control knob or slider to that particular envelope.
In my experience with my M-Audio KeyStudio 25, I have had difficulties with the “Touch” mode, since it does not appear to “see” that I’ve stopped adjusting it. It effectively acts the same as “Latch” mode when I’m using “Touch” mode with that keyboard controller. I believe this is because it is not a “real” control surface, so REAPER and the keyboard are not working well together in that respect. When used by controlling by mouse on the on-screen controls, it works fine.
What do the Automation Modes Really Mean?
Here’s an at-a-glance at what the automation modes will do for you.
Trim/Read mode – In this mode, envelopes are used in playback, but the controls themselves don’t move (i.e. you don’t see the knobs and sliders moving around).
Read mode – In this mode, envelopes are used in playback, knobs and sliders will move, but it won’t save any changes you make to them, even if you’re fiddling with the knobs while it is playing.
Write mode – In this mode, all changes made to an armed control will be saved. This will completely overwrite anything that is already there. If you aren’t moving the control, it will record a flat automation envelope at the current setting.
Touch mode – In this mode, automation is recorded based on you manually altering a control in the UI, such as a volume knob, pan slider, or any setting on a virtual instrument or effect. Touch mode ONLY records new settings while you are touching the control. Once you have stopped “twiddling”, the control will revert to whatever was already drawn in that envelope.
Latch mode – Latch mode is similar to touch mode, except the setting does NOT revert to the previous envelope. So if you let go a volume control on a +3.0dB setting, it will continue to write that same setting until you stop recording.
Til Next Time
That wraps up part 2 of our beginner’s tutorial for REAPER. Stay tuned for more tutorials!
Read the full post here!
Terminology: Arm
In a DAW, the term “arm” refers to the act of turning on a setting or track for recording. This allows you to play back some items (disarmed tracks or settings) while recording on other (armed) tracks or settings at the same time. The origins of the term “arm” come from the language of weaponry, not anatomy.
Read the full post here!
Read the full post here!
Terminology: Automation
In a DAW, Automation refers to the ability to control settings within the DAW from within your project. This is the digital equivalent of adjusting knobs and settings while a track is being recorded, mixed, or mastered.
Automation creates envelopes, which are graphic representations of the settings that are being recorded for use during subsequent playback.
Read the full post here!
Automation creates envelopes, which are graphic representations of the settings that are being recorded for use during subsequent playback.
Read the full post here!
Wednesday, October 1, 2008
Gear Review: Lightsnake USB Instrument Cable

THIS GEAR REVIEW HEAVILY REVISED ON 10/12/08. See here for details why.
One of the initial challenges of getting started with recording your own music with non-virtual instruments is that you have to get them connected. When I first started recording guitars on computers years ago, I would usually record to cassette first, and then patch the tape deck through my sampler. Did it work? Yes. Was it good quality? Absolutely not.
I needed a good solution to hook in my guitar to record some tracks, but I wanted the best quality for the cheapest price. After looking at the various options, most entry-level devices are $150 or more. That's a little richer than I had in my pockets at the time, so I found this odd little device, the Lightsnake, at Target for around $40. I knew nothing about it, had not done any research (like I normally do), but it was a gamble.
So What Is It?
The Lightsnake from SoundTech is best described as a "sound card in a cable", with a USB plug on one end and a 1/4" instrument plug on the other. There is also a 1/4" jack splitter, so you can send the audio signal to another destination (like a monitoring amp). The Lightsnake comes with a CD of drivers if you're running on antique version of Windows (i.e. Windows 98), but newer computers should run fine without special drivers. Interestingly, SoundTech themselves recommend the use of ASIO4ALL as the best driver to use with their product. (The company is completely unrelated to ASIO4ALL, except as fans of it.)
How Do You Use It?
I have tried the Lightsnake in a number of audio programs, including REAPER and Audacity, and I am pleased with the results. The Lightsnake must be plugged in to your USB port BEFORE you start your software, or it will remain unrecognized by most programs.
Every time I run REAPER with the Lightsnake, if turn on monitoring on a track and play through, I get horrible latency (nearly a second delay!). But after I open up the ASIO Control Panel and just LOOK at the ASIO4ALL options, and then close it out, all my latency issues disappear for the rest of the session. I think it may be caused because I don't have the Lightsnake plugged in every time I run REAPER. It is a minor inconvenience, at best.
How good is it?
Originally, I thought the Lightsnake had a fairly clear sound without additional line noise. That was when I was recording with my Daisy Rock Wildwood Acoustic/Electric guitar.
I recently picked up an Epiphone SG Special, which is an admittedly low-end electric guitar. Of course, I plugged it into the Lightsnake. My first reaction was "what in the heck is that racket?" The racket was, unfortunately, an electric pulsing noise over the monitors I never noticed previously (thanks to the gate). Okay, fine. I put a gate in the chain, and did some trial recording with the SG. The gate worked to take off the noise in the silent sections. But as soon as you hit anything loud and sustained (like a chord progression), the noise was embedded in the louder sections. I also tried using the ReaFIR VST in Subtraction mode to build a noise profile. Again, it works fine for trimming the noise off in silent or very light, quick notes, but if you have any continuous playing, you can hear the noise interlaced with your guitar sound.
I took a shot of a spectrograph of the line noise with the Lightsnake plugged into the SG with the volume knob set to zero. What you see is a wash of noise, with a lot of other structured pulses embedded in it. I checked old recordings from the acoustic - I see the same "pulse signature" in the signal. I think the reason I never noticed it with the Daily Rock on recording is that the acoustic is naturally a very full sound, so the noise was actually getting lost in the sound of the acoustic. Since the electric doesn't have the same wide-spectrum wash as the acoustic, the noisy cable is laid bare for all to see and hear.Pretty, Pretty Lights
One of the interesting features of the Lightsnake is the odd green glow that emanates from the entire cable while it is plugged in. This shows that it is connected. But it also pulses and flashes when it is passing data through the cable. This "pretty" feature gives you a clear visual indication that it is doing its job.
Bundled Software
The Lightsnake comes with a throwaway DVD containing 30 day trial versions of pretty much all of the Sony audio programs like ACID, Sound Forge, Vegas, and others. Time-limited trial demo versions don't interest me, so I've never even put the CD in my machine. I was hoping there would be an unlocked/non-trial version of something in the bundle, but instead it is all demos that are available on-line already.
Other User Opinions
The opinions on their forums are very mixed, and it sounds like there may be the occasional manufacturing defect, but more likely there is some level of compatibility issues on some systems. I have heard allegations that the pulsing light can actually affect your audio streams. I believe the type of instrument you plug in (acoustic vs electric) can play a big role in whether any excess noise is noticeable. I believe laptop (on batteries) vs desktop (on AC power) makes a difference in the amount and type of line noise. I bring these items up as a constructive caveat: I've had some good experiences with the cable and some very bad experiences with this cable.
Bottom Line
The bottom line on the Lightsnake is OK for beginners who don't care about the subtle nuances in their sound (like electronic ticking noises), and also for those NOT playing electric. I would recommend looking for something from a larger, more established company. Even though it was substantially cheaper than most entry level input boxes, ultimately you are NOT getting a good deal with this cable.
If you're still interested in trying it out, with these warnings being known, you can find it at most major online retailers.
Read the full post here!
Subscribe to:
Comments (Atom)


