Saturday, December 6, 2008

Gear/Site Review: Hobnox AudioTool

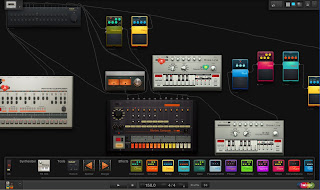
I'm not really sure if this is technically gear to be reviewed or a web site with a cool app. I think it's a little of both. What I'm talking about is an online app that gives you the look, feel, and control of old school electronic music making. What I'm talking about is the Hobnox AudioTool.

Who are they?
Hobnox is a site that focuses on collaboration between artists and is very much centered on the collaborative spirit of the whole "Web 2.0" thing. There's a lot of content on their site, and it ranges from simple to inspiring to a plain waste of bandwidth.

What is it?
The Hobnox AudioTool is a simple point and click interface that simulates a number of major electronic instruments - the TB-303 bass synth, the TR-808 drum machine, and the TR-909 drum machine. You also have a host of other effects pedals to use - everything from compressors, flangers, delays, gates, EQs, Reverb - all standard stomp box effects are here. You also have a 16 channel mixer, a master output control, and signal splitters and mergers. That's a lot of gear to play with.

How do you use it?
The Hobnox AudioTool is extremely simple to use to get started. You connect up wires in the signal paths you want, and let the machines run. Sound simple? It is...if you know the machines. For those of us spoiled by the current style of DAWs to put our music together, this is going to be a completely alien experience. There is no central handler for the patterns in any of these machines. (Yes, you can make the 303 trigger from an external source, but it's still not "true" control, is it?) You build each pattern in each machine, and control them by turning the correct knob. The machines seem to be fairly accurate simulations of the originals, though the 808 doesn't have that unholy deep subsonic bass that the original was notoriously famous for.

No, Really, How Do I Use It?
If you really want to be serious about how to make something "real" with it, you will probably want to Google for programming guides for the TR-808, TR-303, and TR-909. These machines are so popular that there are a wealth of resources on how to use them. I'm not that old school, so I prefer the "what happens when I do this" school of thought. Nothing comes out planned, but it always comes out fresh.

What Can I Do Besides Play Around?
The Hobnox AudioTool includes a recorder function that allows you to record your "performance". It is saved under your Hobnox account (a clever way to encourage you to register on their site). So if you want to get all "old school" with your music, you can build your fantasy machine here, record it, and merge it into another project later on. The files are compressed with a Vorbis encoder, so you may need to convert the output file to another format, depending on your project needs.

Final Thoughts
According to the news on the site, this latest version (which is still listed as a BETA) has a lot of under the hood enhancements that will allow them to (in the future) give users the ability to create new synthesizers and effects. This sounds promising, but it also sounds like they are trying to get people sucked into the vortex of building add-ons for this toy/tool/thing. While I'm all in favor if user-developed content, it seems a little silly to have everything built from scratch for this system. Now what would be really great is if they would develop a VST host into the site, so users could plug in their freeware VSTs. That would give the Hobnox AudioTool a lot more flexibility and value.

As it is, Hobnox AudioTool is a cool toy. It is definitely one of the most advanced audio toys built on a Flash platform to date. It is definitely worth playing with at least once.

Check it out at:
http://www.hobnox.com/audiotool.1046.en.html

Read the full post here!

Thursday, November 27, 2008

Happy Thanksgiving!

While I was getting ready for the Thanksgiving Day feast, it dawned on me that of all the holidays in the United States, Thanksgiving is the only major holiday without its own soundtrack. I don't know why this is, but it seems odd to me.

Christmas Music is a genre unto itself. Valentine's Day has any romantic songs as an appropriate soundtrack. St. Patrick's Day is the traditional stomping ground of any bawdy singalongs. New Year's Eve is filled with songs of reminisce, with "Auld Lang Syne" as the benchmark against which all others are judged. Even Independence Day, Veteran's Day, and Memorial Day have the canvas of patriotic songs that have been deemed "correct".

Yet Thanksgiving only has a few odd novelty songs that really don't do it justice, like Adam Sandler's "Thanksgiving Song". Why haven't we ever found a voice for Thanksgiving? Perhaps it has become so overshadowed by Christmas that nobody cares much about the spirit of Thanksgiving being expressed in song. We gorge ourselves on food, watch some TV, and get up before dawn the next day to fight the crowds and start our Christmas shopping in unison like so many lemmings racing off a cliff, leaving Thanksgiving as a faint memory of having extra time off work.

So what should Thanksgiving sound like? How do you express overeating, football, and the sneak preview of the family stress to come at Christmas? What suits it? Intimately happy songs like Christmas carols? Songs of gluttony and excess? Teen pop? Today the Jonas Brothers performed at a halftime show, which was strikingly odd - they were playing while surrounded by the Dallas Cowboys cheerleaders. It was jarring, but was it Thanksgiving music?

We need to find a voice for Thanksgiving. What does it sound like to you?

Read the full post here!

Saturday, November 22, 2008

Gear Review: Make Your Own Noise With SynthEdit

There is one major reason for the explosion of freeware VSTs available on the web: SynthEdit. If you've never heard of SynthEdit, you've no doubt been the beneficiary of the program. There are a huge number of plug-ins available that were designed with this program, many without any evidence that they were built in SynthEdit. And it's fairly easy to make it work.

What Is It?
SynthEdit, developed by Jeff McClintock, is labeled a "Modular Synthesizer" for Windows. Using a graphic interface, with a "connect the wires" interface, you can create pretty much any plug-in you desire, from a synth to an effects unit, or any sort of hybrid thing you can imagine. It also includes a Save-As-VST function that allows you to use anything you built in any VST host (pretty much any DAW).

How Does It Work?
Written in C++, SynthEdit comes with a battery of component types, ranging from oscillators, filters, math functions, MIDI controllers, memory functions, as well as a host of sliders, knobs, and other control objects. Every object has inputs and/or outputs, color-coded by the type of connection it needs. By connecting up wires between components, you are essentially doing the same thing on-screen that you would be doing with wires and solder if you were building a machine in the physical world. Except here you don't have to worry about causing damage from connecting the wrong bits together.

Is It Really That Easy?
Yes and No. First, it takes some time to figure out what the various pieces and parts do, and how to control them. Thankfully, there are a few examples (and links to more on the SynthEdit web site) to help get you started. I took a stab at following the instructions for the 3-Oscillator Synth posted under "Building Tips" on the web site. It was a good starter tutorial that let you start building simply, and then adding pieces one section at a time.

I say it is also NOT that easy, because there is such a range of options available with the initial download that it wasn't immediately obvious what they did and/or how to use them. (To be honest, some of them are still so foreign to me I haven't the foggiest idea how to use them) I would be willing to bet if you know something more advanced that I do about audio electric design, you'll probably be able to get more use out of it that I have so far.

Help! How do I...
The included Help files are absolutely wonderful. It gives straightforward answers to how to use the program and the features, though in some cases you might need to do some web searching to figure out the theory behind the uses. For the most part, if you are patient and read thoroughly in the help files you can get the explanations you need.

The SynthEdit Community
SynthEdit appears to have a very good community following. Their Yahoo Group has activity pretty much every day, with bug reports and feature requests usually answered within a few hours or so by Jeff McClintock himself. It is always a good sign when the developer is actively interacting with the users, which is something that a lot of the "big box" companies lack.

There is also a lot of sharing going on. Users post new bits of code and new modules they are working on all the time. Chances are fairly good that you can find extra pieces or examples of things you can learn from by looking at the files posted on the Yahoo Group.

For The Hardcore...
If you are a C++ programmer and want to design your own modules for SynthEdit, there is an SDK available on the site. This allows you to "roll your own" to enhance and expand SynthEdit to whatever level you want to take it. This add-on functionality really enhances the option, especially with the active user community.

Alas, It Is Not Free...
Keep in mind, though, that SynthEdit is not a free program. It is shareware. The trial version has some limits (number of patches allowed, only 2 outputs, etc) and has "SynthEdit" plastered all over it. (The registered version will let you remove all traces of SynthEdit, and even let you add your own nag screen to your plug-ins) The registration fee, currently a modest $50, is very reasonable for a program of this quality. The trial is not time limited, so you can give it a good test drive before you decide to buy it.

Bottom Line
Between the quality of the program, the depth of options, the sheer quantity of user-created modules you can use to enhance the program, the great developer support, and the ability to make your own VSTs, it would be hard to argue against this program being a great value. The true deciding factor is how much time and dedication you want to spend on learning to build your own machines. It could be pretty consuming, but the end result is probably worth your while.

You can get it from the official site at http://www.synthedit.com.

Read the full post here!

Tuesday, November 18, 2008

Where is My Cowbell? (a.k.a. General MIDI Drum Assignments)

When you are first beginning to use Drum VSTs, it sometimes comes as a shock when try to actually find the notes that trigger the sounds. This is primarily because drums are attached to individual notes (unlike a synth that you can play up and down the range). It is also because not all Kits are created equal. Most freeware drum VSTs only offer support for a standard 8 drum kit, sometimes more, sometimes less. This makes the game of "find my drum triggers!" even harder, if you're just hunting and pecking.

General MIDI standards
Fortunately for us, this has been a problem from the early days of MIDI music. The General MIDI standard was developed in 1991, and expanded in 1999. In a nutshell, the General MIDI standard included several pieces, most notably the assignments of specific instrument assignments to specific bank slots. So, for example, instrument 10 is always a Glockenspiel on an instrument that adheres to the General MIDI standard.

Drum Standards
For the mostly software-based home studio, most of the General MIDI standard doesn't impact too much, since we are more likely to have pieces that are custom-written specialized for out gear. The portion that I think is more important is the General MIDI Drum Standards. According to the standard, Drums should always be on MIDI Channel 10 (and 11 if you have 2 kits in use at the same time). Even more useful is that specific drum sounds are identified by specific note numbers. Notes 35 to 81 are identified as very specific sounds.

Why Should We Care?
Simply put, it allows you to swap out full drum kits without having to tweak your music. If we didn't follow a common standard, that means to change from one drum VST to another might require you to re-write all the drum parts to connect the entered notes in your DAW to the actual notes the new VST wants. By using General MIDI Drum Assignments, everything is much more portable. And easier to find the sounds you're looking for. (In the piano roll in most DAWs, you should have the option to see "named notes" or "note numbers", so you can see exactly where these sounds should trigger from.)

General MIDI Drum Note Assignments
35 Bass Drum 2
36 Bass Drum 1
37 Side Stick
38 Snare Drum 1
39 Hand Clap
40 Snare Drum 2
41 Low Tom 2
42 Closed Hi-hat
43 Low Tom 1
44 Pedal Hi-hat
45 Mid Tom 2
46 Open Hi-hat
47 Mid Tom 1
48 High Tom 2
49 Crash Cymbal 1
50 High Tom 1
51 Ride Cymbal 1
52 Chinese Cymbal
53 Ride Bell
54 Tambourine
55 Splash Cymbal
56 Cowbell
57 Crash Cymbal 2
58 Vibra Slap
59 Ride Cymbal 2
60 High Bongo
61 Low Bongo
62 Mute High Conga
63 Open High Conga
64 Low Conga
65 High Timbale
66 Low Timbale
67 High Agogo
68 Low Agogo
69 Cabasa
70 Maracas
71 Short Whistle
72 Long Whistle
73 Short Guiro
74 Long Guiro
75 Claves
76 High Wood Block
77 Low Wood Block
78 Mute Cuica
79 Open Cuica
80 Mute Triangle
81 Open Triangle

Closing Thoughts
These are only applicable to instruments that adhere to the GM Standard. Not everyone honors the standard, and there are variations created by plug-in makers who are apparently blissfully unaware that they are making something completely incompatible with any existing drum standard. There are also a number of other accepted formats (mostly pricey "pro" kits) that don't necessarily adhere to the GM Standard. Keep an eye for GM Standards-compliant packages while building your discount studio. It will make transitions a lot easier, and you will always know where your cowbell is. (It's note 56, in case you missed it.)

Read the full post here!

Thursday, November 13, 2008

REAPER Tutorial: Multi-Out Drum Tutorial

One of the hardest parts of a home studio to "get right" is the drums (unless you happen to really be a drummer). In a world of free and/or cheap tools it is hard to find a good virtual drum kit that gives you the options needed to get a solid drum sound and have the ability to mix the drums off into separate channels.

With most free drum VST instruments, if you want to be able to treat each drum separately (i.e. if you wanted to do something like add some extra reverb to ONLY the bass drum), you would be forced to use multiple instances of a standard drum VST, and program each drum sound as a separate instrument. This causes 2 problems: it increases your processing overhead by running 8 or more versions of the same VST (eating your CPU power like candy), and it is really hard to lock in your drum pattern when you're dealing with so many separate MIDI tracks feeding the sound of your drums. Notice I said "most free drum VST instruments"?

GTG Drum Sampler I
GTG makes some absolutely wonderful drum sampler VSTs (and some pretty good synths, too). Most of them feature a stereo out, but the GTG_DrumSampler I features a total of 9 outputs; 1 main output and 8 individual outputs for each piece of the drum kit. The UI has a nice picture of a Drum Kit, and the drums vibrate when they are played, which is a frill, but it's a nice touch.
Configure Your Outputs
First we want to configure the track itself for the drums. Since we know GTG Drum Sampler I has a total of 9 outputs (8 for individual drums), we will need to reconfigure our track for 8 channels. On the track where you want the drums, click on the "io" button on the left of the track panel. This will open the routing window for that track. There is a field in the top left labeled "Track Channels". This usually defaults to 2. Change that to 8.


Configure the Drums
Now that we've expanded the channels that this track will control, let's go to the UI of the DrumSampler I. In the top right of the window, there is a button labeled "9 Outputs". Click this to get the routing matrix for the drum kit. You will get REAPER's attempt to do what you want, which is a stair-step appearance, and completely useless as it is. It is useless because as is you will ONLY hear the bass drum. Here is where the labels take some getting used to. If you just want to hear all the drums together, you need to fill in the boxes for outputs 2 through 9 across the top row (Channel 1). This will play all the sounds through the left channel.

For our purposes, we want all the drums isolated. So instead, let's make the routings in this order: 2->Channel 1; 3->Channel 2; 4->Channel 3;etc. Your routing diagram should look like the one shown here:

This configuration means that the first drum (bass drum) will be output on channel 1, the second instrument (snare drum) will be output on channel 2, and so forth. To see a complete list of the outputs, click on the INFO text in the to middle of the Drum Sampler interface, and it will change to a drum assignment listing. With the way it interfaces with REAPER, these numbers are 1 below the way the output is numbered in REAPER. (BD = 1 actually comes out on output 2, according to REAPER's routing).

Make the Targets
Now we need to make the target tracks for all the drums to go to. We will need 8, and you should probably name them according to the drum to avoid confusion later on. In order, they are: Bass Drum, Snare Drum, HiHat, Tom High, Tom Mid, Tom Low, Cymbal Crash, Cymbal Ride. These new tracks will be IN ADDITION to the track that you have the drum kit installed on.

Lock The Feeds
Now that we have the channels isolated, and somewhere to send them to, we need to enable the sends. Go back to your original Drum pattern track, and click the "io" button again. The first thing we want to do is disconnect this track from the master. We do this because we only care about the drums coming through the individual channels, not from this pattern directly. Disconnect this by removing the check mark from the "Master/Parent Send" option in the top left of the window.

Now click on the drop-down "Add New Send", and select the track you named "Bass Drum". This will create a new block in the window about the send to the track named "Bass Drum". Below the sliders are a couple of drop-downs labeled "1/2 => 1/2". These are channel numbers, and it defaults to paired sends. "1/2=> 1/2" means "send channels 1 and 2 from this track to tracks 1 and 2 on the track I'm sending it to". In our case, we know that the Bass Drum is on Channel 1, since that's what we set up on the Output Routing in the VST. So change the FIRST "1/2" to "1". We will leave the target as "1/2", because that will put the drum as a stereo track in the target track. That's all we need to configure this send.

Now go back to the drop-down "Add New Send", and select the next track, "Snare Drum". Go to the new section it created, and change the send to "2=>1/2" so we send channel 2 to the Snare Drum track. Repeat this process for each of the drums.

Try It Out
That's it! Now insert a new "Empty MIDI Item" on your original drum track, and build a drum pattern. As it plays, you will notice that the mixer controls will show that the levels are coming from the individual drums as they are hit. Build a pattern with all the drums, and play it in a loop. Now you can start playing with adjusting the levels on each drum individually, as well as adding "fx" to individual drums (like the reverb on the bass drum example).

This is a fairly simple example, but by using simple track sends, you can also simulate mic bleed between drums (by adding a send between the drum tracks, with very low volume), among other ideas.

Other Notes
I should also mention that this wonderful drum kit comes with a pretty decent single kit of drum sounds. As far as a standard drum kit, they drum samples that come pre-loaded are pretty solid and will work great for quick drums without the need to sift through samples to build a kit. If you don't like the sounds, you can still load your own through the interface.

Also, the one drawback to using this drum VST is that you are limited to an 8 piece traditional setup. So if you want a double-bass kit, heavy cymbals, extra toms, etc., then you'll need to either use multiple instances of this VST with alternate drums, or upgrade to more serious software. But for simple drum tracks, it's still a great place to start.

Read the full post here!

Friday, November 7, 2008

REAPER Tutorial: How To Save A Project From A Bad Plug In

One of the risks of using virtual instruments and effects is that not all are created equal. You will run into compatibility problems with certain plug ins in certain hosts. I'm pretty much a VST/VSTi user, so I'll focus on those plug-in types, but the tricks I will suggest should work for any plug-in type.

I write this from experience. Recently, I've been working on a new version of an old song of mine, so I've spent a lot of time fiddling with VSTs trying to recapture the original sound and feel of the old song. And I will freely admit I have a lot more plug-ins than I have had time to fully test. This is the perfect scenario where BAD THINGS CAN, WILL, AND DID HAPPEN.

So What Happened?
Everything was fine when the last few times I worked on the song. Everything was running smoothly and I was making a lot of progress. Tonight, I loaded REAPER (and it auto-loaded the project), and instead of gracefully fading out from the splash window, REAPER crashed. I tried it again, it crashed again, but at a different part of the loading process. Third time's a charm, right? Wrong. Third time it loaded most of the way, the splash window got to the "Fading out" status message, and the entire computer froze. I had to resort to a hard reset (hold down the power button until it forces a shutdown). For the sake of full disclosure, I went through this same process (including the forced reboot!) TWICE before I decided I was being stupid.

Option 1: Go To A Backup
REAPER keeps backup copies of the last time you saved the project, so all is not lost. Find the file in the same directory as your project that has the same file name with a .RPP-bak extension. This is the backup made of the next-to-last saved version of your project. Rename it to something with an .RPP extension, and try loading it. If you're lucky, the bad plug in was not included in this version. More likely, it is still in there, and you crash again. If it doesn't crash, you are left with the problem of losing any changes you made since that save. Not ideal, but if the changes are minimal, this might be a viable option.

Option 2: Disable Suspect VSTs
If you have a pretty good idea of what new VST you added before the project went south, you can disable the suspect VST in one of two ways. One: Find the .dll file for that VST and rename it with a different file extension, like .dll_disabled. Two: Move the entire VST out of the path that REAPER looks at. This can be a good idea if you know exactly what you've been playing with, and can isolate the one "problem child".

Option 3: Kill Em All
In my situation, I had been working with so many VSTs, I had no clue what was in and was not in my project. So I instead renamed my root VST folder to another name, so REAPER wouldn't find any of my VSTs. When REAPER loads, it will not find any VSTs under the path it is looking at, so it will present you with a clear list of all plug ins it couldn't find. Copy down this list. Rename your VST folder back to its original name. Now you can try the same steps I outlined in "Option 2: Disable Suspect VSTs", since you now know every VST in your project. I can almost guarantee one of them doesn't play nicely. Move one out (or rename the .dll), try it. If the project works fine, then keep that VST separate/out of your toolkit. Newer versions of REAPER might work with it, so I'd recommend having a "doesn't work with REAPER yet" folder to drop all of these into.

Safe At Last
In an ideal world all VSTs would work with all hosts. I've never been "under the hood" on a VST host before, so I'm really not sure why some plug-ins are stable in one program and totally corrupt in others. But the fact remains that this is a reality. Since there are so many free/cheap VSTs out there, I know I don't really have too much to complain about if one doesn't work correctly in my DAW. For just about any type of plug in you want, you can probably find dozens of others out there that might work better.

If You Like Testing...
If you're the type of person that likes to have all the bugs worked out before you start, then you should test each and every plug in before you put it in your "real" toolkit. I have seen plug ins that crash on saving the project, crash on loading the project, crash on loading the plug in itself, as well as aberrant behavior when twiddling knobs in their UI, and even the occasional situation where using the same plug in multiple times in the same project will cause a meltdown. Frankly, there are so many parameters, I can't even imagine how rigorous the testing should be to declare a plug in "stable".

If You'd Rather Live on the Edge...
I'd rather spend my time playing than testing, so most of my "uh-oh" crashes come during real projects. So if you're like me, you'll need to get used to recovering quickly from a total project collapse. Once you step back, take a deep breath, and look for the unruly plug in, things will sort themselves out pretty quickly. I have also seen quite a few references in the forums to "pro grade" (i.e. expensive) plug ins that are also temperamental and will crash out your DAW, so the problem is definitely not just because you're using "the cheap stuff" like I am. These problems come with the territory, so get used to it.

Good Luck and Happy Bug Hunting!

Read the full post here!

Thursday, October 30, 2008

Not all XPs are Created Equal...

I have recently come to terms with the fact that not all versions of Windows XP are equal. I have been blissfully unaware for the past couple years that Windows XP Media Center Edition is the ugly stepchild of the XP world. Yes, that's the OS I have been running. Somehow I have managed to keep myself on versions of Windows that are the least desirable for years. Before the Windows XP Media Center Edition, I had Windows ME. Oops.

So what does this have to do music? Simply put, it means everything. I have yet to find music production hardware or software that doesn't single out WinXP MCE as being not supported. It gives you a sinking feeling when you have a piece of software (or hardware) that runs on basically everything from Windows 95 to Vista, but doesn't run on this one version of XP.

What's So Special?
Windows XP MCE is a somewhat stripped version of Windows XP Pro, with the addition of the "Media Center" features. Those features are really only useful if you have your computer hooked to your main TV and feel like using your computer with a remote control. For the record, I am not one of those people. From what I understand, WinXP MCE lacks class-compliant audio drivers, which hurts some processes. It also is running their "Media Center" services, which I understand have the potential for clashes with audio processes.

The Straw That Broke...
For me, the last straw that made me decide I needed to fix my OS "problem" was when I changed my PC audio from using the onboard audio to a Sound Blaster Audigy 2 card. As soon as I switched sound card drivers, my MIDI keyboard quit being recognized. The PC told me it was there, but it didn't want to believe it was a valid MIDI interface! After some poking around, I found I could make it work again by disabling the Gameport/MIDI port that's on my Sound Blaster. I'm sorry - that makes no sense that I have to disable one MIDI port to make an unrelated USB MIDI device recognized. This was caused by XP MCE's audio compatibility problems.

What Can I Do?
You've got two options if you're running Windows XP MCE, as I see it: you can try to trick your system into behaving less like MCE, or you move to another OS. As far as tricking your system, there are forum posts out there that claim to give a list of registry keys to edit to disable the MCE features, which some people claim helps with SOME problems. But you are still left with the "it might work, it might not" status with every item you're drooling at in the latest Musician's Friend catalog or at your local music store.

Run Away...
I took the latter option: I have actually moved my home studio forward by downgrading my PC to use Windows XP Home Edition. Since I'm (ahem) frugal, I have an extra PC that was a hand-me-down from a friend who was going to throw it away. It had XP Home Edition installed. So I backed up everything from both systems onto CD and DVD, wiped the hard drives, and started over with fresh installations on both machines: XP Home Edition on my main computer, and XP MCE on the hand-me-down. It took a week to back up everything I needed, and a weekend to get the machines scrubbed and rebuilt, and a few more days to get all the apps in place and configured the way I want them.

Last Thoughts
If you're running XP MCE, don't let this scare you too badly. A lot of audio gear I was using worked fine. REAPER was rock solid. The Lightsnake, despite the interference, worked normally under XP MCE. But if you keep growing your studio based on XP MCE, be aware that you're rolling the dice each and every time you invest in new gear. But if you choose to move to another OS, I would advise XP Home or XP Pro, since Vista is also fairly well unsupported by a lot of companies at this point.

(Before I get the Mac contingent on me, yes, OS X is more stable for audio apps, but having to re-buy your apps on another OS is really counter-productive to being frugal.)

Read the full post here!

Tuesday, October 21, 2008

Tutorial: Fixing a Noisy Line, Part 2

In Part 1 of this tutorial, we looked at gear and line investigation techniques to try to identify and/or minimize the problem. Here, in Part 2, we will focus on software solutions to handling a noise-laden signal.

REAPER Tools
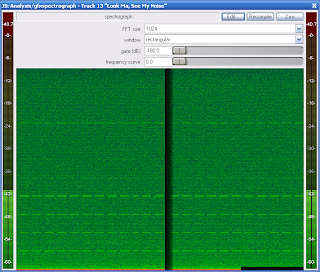
While using REAPER, I have found 2 viable options to cleaning up a noisy audio track bundled with the program itself. ReaGate, and ReaFir. We will look at both of these options in turn. But first, we need a good way to see the sound. REAPER comes with a good tool for just this purpose: "JS: Analysis/gfxspectrograph". Add this into the end of your FX Chain, and you can use it to visually monitor what is coming across on your line. Totally black means it is totally silent. You can use this to gauge the effectiveness of your cleanup methods.

ReaGate
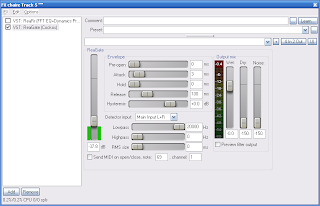
ReaGate is the bundled VST gate that comes with REAPER. A gate is essentially an automatic on-off switch for the audio. When the overall level drops below a certain threshold, the line is silenced. Gates usually have a bunch of other features, but you probably don’t need them forthis situation. To use ReaGate, add it to your FX Chain. It should be in the top slot, before any other plug-ins are used. This will keep the other plug-ins from amplifying the noise problem.

On the left of the ReaGate interface, you have a vertical slider that measures dB (decibels). The higher you move the slider, the higher the threshold for the gate to turn off the sound. Move the slider up until the background noise disappears. For my situation, a setting of –37.8 db was the lowest point where the noise dropped off. The green bars beside the threshold reflect the incoming signal. You can watch the Output mix meter on the right hand side to see when the Gate turns the signal off.

To Gate or Not To Gate
Gates are a tricky thing. On one hand, they stop the low-level noise from coming through very well. But when you have a gate in your chain, ANY sound below that threshold will be cut off as well. So if you’re letting a guitar ring out, when it hits that threshold your sound is completely dropped out. Depending on your style of music, this clipping could sound really strange and unwanted.

ReaFir
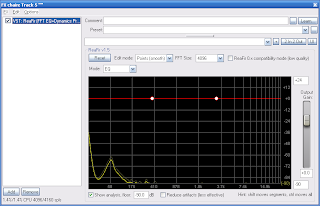
Another option is ReaFir, with is identified as a FFT EQ+Dynamics Processor. This is a tool with quite a few modes, including a gate. The gate in this doesn’t work quite the same, and is not as effective as the standalone ReaGate, in my opinion. Change the “Mode” to “Subtract”. There will be a new check box beside it labeled “Automatically build noise profile (enable during noise)”. This feature can be your new best friend. Make sure your equipment is connected and that the track is armed, with monitoring on. If you are combating line noise, turn your instrument’s volume to zero. If your trouble is from the instrument itself, silence it as best you can with the volume at your normal recording levels. (For guitars, you can loosely tie a bandanna or other soft cloth around the neck so it mutes the strings.) You should see the noise profile pulsing in the window.

FFT Size
This setting is essentially the size of the “chunk” of data it will evaluate at a time. A smaller number means it pushes your computer harder, because it is evaluating a lot of data. A larger setting is more economical on your system resources, but it also causes a lot of latency while monitoring. Personally, I usually set mine to 512, and it is a good balance between the two.

Build A Noise Profile
Mark the check box beside the “Build a noise profile” option, and let it run for a few seconds. A red line will begin to raise from the bottom where it is detecting noise. After it stops adding to its height, click on the check box again. That’s it. You have now build a noise profile that will be applied to the audio signal passing through this VST. This is basically a frequency-reactive gate, where a traditional gate is volume-reactive.

ReaFir or ReaGate?
Both ReaFir and ReaGate suffer from the same problem with sustained audio levels. Neither one is actually removing the individual components of the noise. They are both removing the audio when there is little or no instrument audio. If you have sustained sound coming through, like you would with a rhythm guitar passage, then the noise might be evident within the sound of the guitar itself. This is because gates are trimming the quiet levels noise, but they do nothing to actually stop the individual elements of the noise. I personally prefer ReaFir's "subtract" mode to a traditional gate, because the sound doesn't just stop when it reaches a certain point. Individual frequencies do, but not the entire sound. It sounds like a more natural fade than what you get from a gate crashing down on your sound.

Other Options
Depending on your noise source, you can also investigate notch filters to try to remove individual offensive frequencies, but these will impact your overall tone significantly. In my situation, I have such a wash of noise across a lot of frequencies that it is impossible for me to take this approach.

Do you have other software tricks that you’d like to recommend? Post a comment!

Read the full post here!

Saturday, October 18, 2008

Tutorial: Fixing a Noisy Line, Part 1

Something I’ve been combating lately in my recording is line and interface noise. As I mentioned recently, the Lightsnake USB interface I’ve been using worked OK with my acoustic, but once I started recording with an electric guitar, the noise is much more prominent. There are 2 ways to correct a noisy interface: 1) Buy Better Gear, or 2) Use the tools you have to try to minimize the audible noise coming through.

Since we are about frugality, we will assume that you don’t have the scratch right now to pick up a better interface. (I’m crossing my fingers and hoping a better interface box is under the Christmas tree, or at least some cash to buy it guilt-free.) That leaves us with the duct tape and chewing gum solution (i.e. a non-ideal solution) to cleaning up your audio.

Check Your Wires
The first thing to check when you’ve got excess noise coming on your input is to check the connections. Do you get pops and crackles when you touch the cables while connected? You might have a broken wire that is adding noise when it is flexed. It might be cracked shielding in the cable that might be picking up interference. Try to eliminate as many sources of noise. And remember, an incoming audio source MUST be plugged in to something when you’re testing. A cable end dangling on the floor usually will pick up a little charge from the air, perhaps a little extra hum from finger grime on the plug ends. Also, make sure the volume on the instrument is turned all the way down. This will help you isolate whether it is the instrument’s electronics causing the noise or something with the line/interface itself. If you identify a possible broken wire, try to swap it out and see if that helps.

Check Your Gear
If you have a clean line when the instrument’s volume is turned off, then you might have a problem in your gear itself, or interference causing problems with the gear. I have found that CRT monitors will cause a little extra hum on some lines. If you can, turn off the CRT and see if the sound goes away. If this is the case, then see if you can re-route things to keep the lines further from the monitor.

Another source can be some fluorescent light fixtures. I have used a couple that will generate a lightsaber-style hum on lines nearby. Turn off the lights and see if that helps.

If you can determine that the instrument is somehow at fault, but you can’t identify anything else reacting with it, then you may want to consider borrowing someone else’s similar instrument to see if it exhibits the same problem, or take the instrument to a qualified tech and see if there are modifications you can make to reduce the noise. (For guitars, these usually either means replacing pickups, switches, or at least having the wiring re-soldered to make better connections.)

Extra Hardware
Sometimes you can isolate that it is the instrument, but there’s nothing you can do to directly fix it. There are some line filters and power filters that might be able to help fix your signal. Frankly, most of those are out of my price range, especially for a “it MIGHT fix the problem” potential solution. If you have friends with this type of extra gear, by all means borrow their equipment and see if it cures your ills. If it does, start saving your loose change to buy one for yourself. Again, this falls under the “Buy Better Gear” option, which isn’t always a viable course to take.

It’s the Interface!
In my situation, I was able to isolate it to the Lightsnake itself. As I explained in my post “Eating My Own Words”, it became more evident with the electric guitar than with the acoustic, but it is definitely the interface itself, since I don’t get the same problem with other line or microphone inputs on the same computer.

Software Solutions
If your final verdict is like mine, then the garbage on the input can’t be directly avoided without buying new hardware, so you have to try to clean up the signal after it has been received. In Part 2 of this tutorial, we will look at software solutions to this problem.

Read the full post here!

Sunday, October 12, 2008

Eating My Own Words - Lightsnake Review Updated

Well, I'll be the first to admit that having to eat your own words is not too tasty, but sometimes it is exactly what you need to do.

Recently I posted a review of the Lightsnake USB Instrument Cable. In that review, I gave it decent marks in my experience - no errant line noises like some people claimed to have heard (I even parroted the corporate "must be a bad cable" approach to people's problems.) I have once again proven to myself that you will get different results with different gear. At the time I wrote that review, I had only one guitar to try with it, a Daisy Rock Wildwood Electric/Acoustic Guitar. So my review reflect my experience with it at that time. The extra environmental noise normal with an acoustic guitar in a non-soundproofed environment caused me to always put a gate in the effects chain to clean it up. The natural fullness of sound from the acoustic guitar came across nicely and I was satisfied that the (gated) recorded material was fairly accurate to the original sound.

I recently picked up an Epiphone SG Special, which is an admittedly low-end electric guitar. Of course, I plugged it into the Lightsnake. My first reaction was "what in the heck is that racket?" The racket was, unfortunately, an electric pulsing noise over the monitors I never noticed previously (thanks to the gate). Okay, fine. I put a gate in the chain, and did some trial recording with the SG. The gate worked to take off the noise in the silent sections. But as soon as you hit anything loud and sustained (like a chord progression), the noise was embedded in the louder sections. I also tried using the ReaFIR VST in Subtraction mode to build a noise profile. Again, it works fine for trimming the noise off in silent or very light, quick notes, but if you have any continuous playing, you can hear the noise interlaced with your guitar sound.

I took a shot of a spectrograph of the line noise with the Lightsnake plugged into the SG with the volume knob set to zero. What you see is a wash of noise, with a lot of other structured pulses embedded in it. I checked old recordings from the Acoustic - I see the same "pulse signature" in the signal. I think the reason I never noticed it with the Daisy Rock on recording is that the acoustic is naturally a very full sound, so the noise was actually getting lost in the sound of the acoustic. Since the electric doesn't have the same wide-spectrum wash as the acoustic, the noisy cable is laid bare for all to see and hear.

So here I sit, eating my own words about my value shopping, and have to say I spent my money poorly. (However, I have been using it for 6 months or so before I came to that conclusion, so maybe it wasn't a total waste.) I heartily recommend saving your pennies (as I am) and save up for a more "pro" box. I'm currently looking at the Line 6 TonePort series, since it is more of a name brand with a lot more positive reviews.

Since this is the net, we can rewrite history, so I plan to. I have added the core of this post into my original Lightsnake review, so folks stumbling across it will be wiser that I was when I first wrote it.

Read the full post here!

Thursday, October 9, 2008

Site Review: HowToTuneAGuitar.org

If you've ever looked for instructional guitar videos online, you'll find an ugly pile of subscription sites and "pay us and you'll play like Clapton in thirty days" claims that you know are extremely bloated. I've looked at a few sites that have appeared to be good, but I'm not going to spend the money to get into the subscription areas. It seems like it is a misguided use of my money. Recently I have come across a site that is playing by a (slightly) different set of rules: http://www.howtotuneaguitar.org.

Why On-line Tuning?
The name of the site makes it seem like a one-trick pony, but it actually has more goodness buried inside. First, let's talk about the main focus: Tuning a guitar. Yes, I know most guitarists have a digital tuner of their own, but when you're working at your desktop studio, sometimes it is easier to use online tools than to 1) find your tuner, 2) find fresh battery for the tuner, 3) unplug your rig to connect the tuner, 4) tune it, before 5) putting everything back the way it was, and you've forgotten what you were going to play.

Tune Me
The online tuner is a six note widget that allows you to turn on each note, and it will repeat a clean guitar tone of that note until you turn that one off. Then you can tune by ear to the tone it plays. (If you're really interested in wasting time, you can play a rudimentary tune on it, as long as you are only playing the open strings - but that's goofing off, isn't it?) What makes this so helpful beyond a pocket tuner is all of the alternate tunings. There are a ton of alternates both familiar (Drop D, Half Step Down, etc) and a lot that are completely alien to me (I have no idea WHAT a Buzzard tuning is, but I now know it tunes to C, F, C, G, A#, F). One weakness to the tuner is that when it is playing tuning notes for alternate forms of instrument, it uses the same tones. For example, the Dobro setting still sounds like a regular guitar. But this can be overlooked for two main reasons: It is a free tool, and I don't actually own any of the unusual instruments like a Dobro.

Another bonus is the tuner widget. It is a mini-version of the tuner on the site, but limited to standard tuning only. I have embedded it in my sidebar (Called "Tune-O-Matic"), if you want to play with it.

Tutorials
In addition to the tuner, the site also features a decent library of guitar lessons. These do not appear to be custom videos for the site, but rather the results of extensive YouTube digging. As a result, they are at various levels of helpfulness, and the "teachers" are at various skill levels themselves. But they are pretty good. (I particularly like the way the teaching video for "Keep On Rockin' In The Free World" includes on-screen diagrams and read-along fingering and pattern charts overlaid over the video). Even though these are all YouTube embedded videos, the site provides a good filter for pre-screened content, so you don't have to waste time getting lost in the vacuum of YouTube, where people have been known to get lost for days.

Chords and Scales
They also another widget called "Chordbot", which gives you 4 fingerings for just about every possible chord you've ever heard of, in a nice visual of the fretboard in a very readable format. If learning the various scales is more your interest, there are also multiple fingerings presented for every major and minor scale, again in a nicely presented format (though as individual pages for each scale, unlike the integrated "Chordbot").

Reviews
There are a few "reviews" on the site as well, primarily of teaching tools and lesson software. I'm not too interested in buying lessons, as I mentioned earlier, but I took a closer look anyway. It didn't take long to realize that the "reviews" section is really just an affiliate link farm, with all the ones I checked linking to pages that were built in exactly the same endless one-page-infomercial format common with "get rick quick" e-book sites. So there isn't anything that I would consider a "review", and I'd recommend pretending that section doesn't exist.

Other Stuff
Yes, there is actually a section called "Other Stuff", which is a infrequent blog of guitar related topics. There seems to be some level of ranting against Guitar Hero, but that's to be expected from "normal" guitarists. Not a lot of action on the blog, so probably not something to be on the top of your feed reader (if at all).

The Good, The Bad, The Ugly
HowToTuneAGuitar.org is good at their core proposition: tuning your guitar. They are also good with their collection of YouTube-scavenged Guitar lessons. And yes, the Chordbot and the scales are worth your while, too. The rest? Blatant ads that take up more space than their original content. Go for the tuner, stay for the Chordbot and the lessons. Skip the rest.


Read the full post here!

Sunday, October 5, 2008

Remix Other People's Music

Previously, I talked about rewriting other people's songs in a different style (see Musical Re-Visioning) as a tool to break out of your box. Another way to break out of the doldrums and get something new going is to remix other people's music.

In the early 90's, I used to do this without really thinking of it as remixing. I would record sound bites on a tape deck, jack it into the Perfect Sound sampler on my Amiga 500, and rip small passages that I later would use in my own "new mixes". Sure, they were gritty, 8-bit samples with WAY too much background music, but they helped stretch my imagination because I was playing with full musical passages, lyrics, and a musical signature that wasn't my own.

Like other techniques I have mentioned here before, remixing is an interesting way to get your hands dirty and come away with not only a new appreciation for the complexity (or simplicity) of the artist's work, but also with more knowledge of how they assembled their beats, how they took simple passages and made a really memorable song, etc. You increase your mental musical database with these snippets that will influence your later original work.

Where To Start
Now with the free-for-all of the web and the change in moods from some artists, you can take this a step further than my early remixing attempts, without all the suffering through poor quality rips of passages and the omnipresent "other music" behind the clips you really want. We are now in a climate where some artists are releasing the bare bones bits-and-pieces of their songs with the intention or creating remixes. A couple artists that are worth noting doing exactly this (separately) are Jay-Z and Nine Inch Nails.

Jay-Z released an acapella version of The Black Album, which immediately encouraged fans and remixers to use his tracks in their own mixes. (The best of the remixes of this has got to be Danger Mouse's "Grey Album", which remixes Jay-Z with The Beatles' "The White Album". It has been banned from official release, which means you can find it all over the web, but can't actually buy it. Find it. Enjoy it.) One downside is that Jay-Z released the acapella version as another commercial album, so there's no free ride here.

Nine Inch Nails has taken another approach, by releasing all the source audio tracks from quite a few of their songs for free download on their site. These are in a variety of formats, including GarageBand, Ableton Live, as well as raw WAV files for people using other programs. They also released the source tracks for EVERY SONG from the album "Year Zero" on their followup remix album "Y34RZ3R0R3M1X3D" as enhanced CD content. More recently, they released the source tracks to every song on their latest album "The Slip" on their site. To take it even a step further, they have provided an online community to share your remixes of their material online and to listen to other people's remixes as well. You can find the Nine Inch Nails remix community at http://remix.nin.com.

Drop me a line or post a comment if you have found any other worthwhile artists giving away source material for remixes. It is always fun to see how established artists crafted their songs (and how easily we can take their visions in other directions).

Read the full post here!

Thursday, October 2, 2008

REAPER Tutorial 1 - Part 2

BEGINNER TUTORIAL

Part 2: Let’s twiddle some knobs…

In Part 1 of this tutorial, we walked through the basics of setting up a MIDI track with a stock VST and made a little tune, and extended it to loop. In Part 2, we are looking at what I refer to as “knob twiddling” – dynamically changing settings within your track structure in REAPER. This is a very small part of REAPER, but the end results of “knob twiddling” can really help your music “pop” for the listener. We will assume you have either the sample track you threw together in Part 1, or have a track loaded that you want to experiment with.

What Is It Called, Really?
The official term for the function is “Automation”. Automation allows you to control the settings of pretty much everything in your track either in a live mode or by actually drawing the settings as a line across your tracks themselves. When I say pretty much everything, I mean it. You can control volume (before and after your effects chain), pan (before and after your effects chain), as well as every control available in your virtual instruments and effects. This allows you to create exactly the same “knob twiddling” as would often happen during recording, mixing, or mastering phases of production.

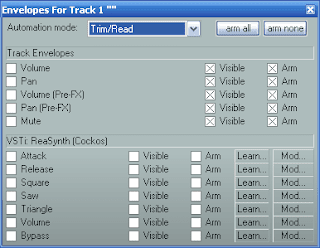
The control envelopes are grouped by what instrument or effect the control resides in, with the control’s proper name on the left. Check the box beside it to turn it on. If it is turned off, this entire envelope will be disabled. The “Visible” controls whether or not the automation line itself will be visible on top of the track display. The “Arm” check box controls whether or not this particular setting is ready to be recorded.

How To Get There From Here
To the left of the track display is a button that by default is labeled “trm” (This is showing that the envelope control is currently in “Trim/Read” mode. The label on the button will change depending on the mode it is set to). Clicking this will launch the automation control menu (with a title “Envelopes for Track #”). At the top of the display where is a drop-down box for “Automation mode”. We’ll get to what those options mean in a moment. The basic layout of the menu will expand as you add instruments and effects to your track, but the way you control them is identical.

The control envelopes are grouped by what instrument or effect the control resides in, with the control’s proper name on the left. Check the box beside it to turn it on. If it is turned off, this entire envelope will be disabled. The “Visible” controls whether or not the automation line itself will be visible on top of the track display. The “Arm” checkbox controls whether or not this particular setting is ready to be recorded.

Armed and Ready To Twiddle
Let’s try bouncing some tracks from left to right. Check the box to the left of “Pan”. Make sure “Visible” and “Arm” are both checked. (The normal default is to have them already checked for the Track Envelopes.) Change the Automation Mode to “Write”. Close the Envelope window.

You’ll notice that the pan control to the left of the track display has changed color, to a menacing red, and there is now a line across the track itself. Press the play button on the transport. As the track plays, click on the pan slider and start shifting it back and forth. The envelope line over the track will change itself to represent the values you are changing the slider to (For the pan control, pan full right is at bottom and pan left is at the top, so you can see the value.)

Re-open the Envelope window (the button is now labeled “wrt”) and change the Automation mode to “Read”. (“Read” will let you see the controls moving, “Read/Trim” will not move the controls). The pan control now is green, so you can see that it is going to move for you.

Hit play, and your track should now ping-pong back and forth in something reminiscent of Pink Floyd’s dangerous-to-listen-to-on-headphones “Interstellar Overdrive”.

Let’s Fix Something
Maybe you decide that everything is perfect except for a small part where you want to alter your pan envelope. Let’s fix it using “Touch” mode. Open the Envelope window (the button now is labeled “rd”), and change the Automation mode to “Touch”. Close it again. The pan control is now an odd yellow shade.

Hit play and get your mouse up to the pan control quickly. Let the envelope you already recorded play for a bit, and then grab it and twiddle it again for a little bit, and release it. This has now overwritten only that section of the envelope. As soon as you let go of the slider, the envelope will snap back to whatever was recorded before.

If you had used the “Latch” mode, it would have been exactly the same process, except when you let go of the control, the rest of the envelope would have written out the same setting that you left the control on.

Let’s Fix Something By Hand
Sometimes the adjustments you want to make are something you are struggling with changing live, as we just did. If you want to “knob twiddle” by hand/mouse, you simply need to check the box to the left of the setting you want to control, and make sure the “arm” and “visible” boxes beside it are both checked. It doesn’t matter what Automation mode you are in – hand/mouse editing still works. If you have points all over your line, as you have from our prior recording, you can grab a point on the line and drag it to its new value. It’s that simple.

If you are overwhelmed by envelope points, you can click on them to select them, right-click, and there are several delete options if you want to purge them. If you don’t have enough for what you’re doing, just double-click on the line and a new point will appear.


Changing Line Shapes
By default, all lines between points are straight lines. If you want to change this (and change the behavior of the envelope itself), you can right-click on a point, and select “Set point shape”, which will give a sub-menu of several options, including Square, Slow Start/End, Fast Start, Fast End, and Bezier. If you change this, it will modify the line from the current point to the next point only. This gives you the flexibility to make the individual segments of the envelope behave differently, so you can tweak for exactly the effect you want. You can also change the default to something other than “Linear” from the same right-click menu “Set envelope default point shape”.

Can’t I Just Type Them In?
Yes, you can. Create the points on the line by clicking where you want values, then right-click on the point and select “Set point value”. A menu will pop up that allows you to not only type in a value, but also select the Line Shape for the point. This is really useful when you are working with envelopes for controls that have only a few specific values that you want to adjust to.

What about external control?
You can also record input from external control surfaces and external interfaces. You need to have the control either directly mapped or use the “Learn…” control to assign a control knob or slider to that particular envelope.

In my experience with my M-Audio KeyStudio 25, I have had difficulties with the “Touch” mode, since it does not appear to “see” that I’ve stopped adjusting it. It effectively acts the same as “Latch” mode when I’m using “Touch” mode with that keyboard controller. I believe this is because it is not a “real” control surface, so REAPER and the keyboard are not working well together in that respect. When used by controlling by mouse on the on-screen controls, it works fine.

What do the Automation Modes Really Mean?
Here’s an at-a-glance at what the automation modes will do for you.

Trim/Read mode – In this mode, envelopes are used in playback, but the controls themselves don’t move (i.e. you don’t see the knobs and sliders moving around).

Read mode – In this mode, envelopes are used in playback, knobs and sliders will move, but it won’t save any changes you make to them, even if you’re fiddling with the knobs while it is playing.

Write mode – In this mode, all changes made to an armed control will be saved. This will completely overwrite anything that is already there. If you aren’t moving the control, it will record a flat automation envelope at the current setting.

Touch mode – In this mode, automation is recorded based on you manually altering a control in the UI, such as a volume knob, pan slider, or any setting on a virtual instrument or effect. Touch mode ONLY records new settings while you are touching the control. Once you have stopped “twiddling”, the control will revert to whatever was already drawn in that envelope.

Latch mode – Latch mode is similar to touch mode, except the setting does NOT revert to the previous envelope. So if you let go a volume control on a +3.0dB setting, it will continue to write that same setting until you stop recording.

Til Next Time
That wraps up part 2 of our beginner’s tutorial for REAPER. Stay tuned for more tutorials!

Read the full post here!

Terminology: Arm

In a DAW, the term “arm” refers to the act of turning on a setting or track for recording. This allows you to play back some items (disarmed tracks or settings) while recording on other (armed) tracks or settings at the same time. The origins of the term “arm” come from the language of weaponry, not anatomy.

Read the full post here!

Terminology: Automation

In a DAW, Automation refers to the ability to control settings within the DAW from within your project. This is the digital equivalent of adjusting knobs and settings while a track is being recorded, mixed, or mastered.

Automation creates envelopes, which are graphic representations of the settings that are being recorded for use during subsequent playback.

Read the full post here!

Wednesday, October 1, 2008

Gear Review: Lightsnake USB Instrument Cable


THIS GEAR REVIEW HEAVILY REVISED ON 10/12/08. See here for details why.

One of the initial challenges of getting started with recording your own music with non-virtual instruments is that you have to get them connected. When I first started recording guitars on computers years ago, I would usually record to cassette first, and then patch the tape deck through my sampler. Did it work? Yes. Was it good quality? Absolutely not.

I needed a good solution to hook in my guitar to record some tracks, but I wanted the best quality for the cheapest price. After looking at the various options, most entry-level devices are $150 or more. That's a little richer than I had in my pockets at the time, so I found this odd little device, the Lightsnake, at Target for around $40. I knew nothing about it, had not done any research (like I normally do), but it was a gamble.

So What Is It?
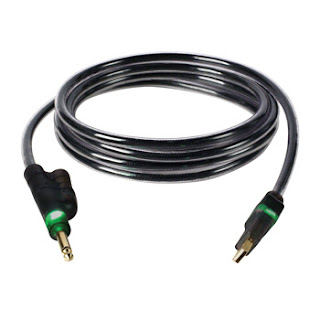
The Lightsnake from SoundTech is best described as a "sound card in a cable", with a USB plug on one end and a 1/4" instrument plug on the other. There is also a 1/4" jack splitter, so you can send the audio signal to another destination (like a monitoring amp). The Lightsnake comes with a CD of drivers if you're running on antique version of Windows (i.e. Windows 98), but newer computers should run fine without special drivers. Interestingly, SoundTech themselves recommend the use of ASIO4ALL as the best driver to use with their product. (The company is completely unrelated to ASIO4ALL, except as fans of it.)

How Do You Use It?
I have tried the Lightsnake in a number of audio programs, including REAPER and Audacity, and I am pleased with the results. The Lightsnake must be plugged in to your USB port BEFORE you start your software, or it will remain unrecognized by most programs.

Every time I run REAPER with the Lightsnake, if turn on monitoring on a track and play through, I get horrible latency (nearly a second delay!). But after I open up the ASIO Control Panel and just LOOK at the ASIO4ALL options, and then close it out, all my latency issues disappear for the rest of the session. I think it may be caused because I don't have the Lightsnake plugged in every time I run REAPER. It is a minor inconvenience, at best.

How good is it?
Originally, I thought the Lightsnake had a fairly clear sound without additional line noise. That was when I was recording with my Daisy Rock Wildwood Acoustic/Electric guitar.

I recently picked up an Epiphone SG Special, which is an admittedly low-end electric guitar. Of course, I plugged it into the Lightsnake. My first reaction was "what in the heck is that racket?" The racket was, unfortunately, an electric pulsing noise over the monitors I never noticed previously (thanks to the gate). Okay, fine. I put a gate in the chain, and did some trial recording with the SG. The gate worked to take off the noise in the silent sections. But as soon as you hit anything loud and sustained (like a chord progression), the noise was embedded in the louder sections. I also tried using the ReaFIR VST in Subtraction mode to build a noise profile. Again, it works fine for trimming the noise off in silent or very light, quick notes, but if you have any continuous playing, you can hear the noise interlaced with your guitar sound.

I took a shot of a spectrograph of the line noise with the Lightsnake plugged into the SG with the volume knob set to zero. What you see is a wash of noise, with a lot of other structured pulses embedded in it. I checked old recordings from the acoustic - I see the same "pulse signature" in the signal. I think the reason I never noticed it with the Daily Rock on recording is that the acoustic is naturally a very full sound, so the noise was actually getting lost in the sound of the acoustic. Since the electric doesn't have the same wide-spectrum wash as the acoustic, the noisy cable is laid bare for all to see and hear.

Pretty, Pretty Lights
One of the interesting features of the Lightsnake is the odd green glow that emanates from the entire cable while it is plugged in. This shows that it is connected. But it also pulses and flashes when it is passing data through the cable. This "pretty" feature gives you a clear visual indication that it is doing its job.

Bundled Software
The Lightsnake comes with a throwaway DVD containing 30 day trial versions of pretty much all of the Sony audio programs like ACID, Sound Forge, Vegas, and others. Time-limited trial demo versions don't interest me, so I've never even put the CD in my machine. I was hoping there would be an unlocked/non-trial version of something in the bundle, but instead it is all demos that are available on-line already.

Other User Opinions
The opinions on their forums are very mixed, and it sounds like there may be the occasional manufacturing defect, but more likely there is some level of compatibility issues on some systems. I have heard allegations that the pulsing light can actually affect your audio streams. I believe the type of instrument you plug in (acoustic vs electric) can play a big role in whether any excess noise is noticeable. I believe laptop (on batteries) vs desktop (on AC power) makes a difference in the amount and type of line noise. I bring these items up as a constructive caveat: I've had some good experiences with the cable and some very bad experiences with this cable.

Bottom Line
The bottom line on the Lightsnake is OK for beginners who don't care about the subtle nuances in their sound (like electronic ticking noises), and also for those NOT playing electric. I would recommend looking for something from a larger, more established company. Even though it was substantially cheaper than most entry level input boxes, ultimately you are NOT getting a good deal with this cable.

If you're still interested in trying it out, with these warnings being known, you can find it at most major online retailers.

Read the full post here!

Friday, September 26, 2008

Curing Latency on a Windows PC: ASIO4ALL

One of the biggest issues in electronic recording is the issue of latency - the delay caused by the time it takes to process the audio signal. If you're using a Windows PC, chances are that you are running on a system that is slightly unstable for audio. The average user has whatever sound card that came bundled with their PC and are happy because it makes the correct noises. When you get into electronic recording, you will find that your system has serious latency issues.

How Latent Are You?
An easy way to demonstrate latency is to plug in a microphone to your PC, enable it so the speakers are monitoring the microphone, and talk/sing/make noises. Hear that delay between your voice and the voice coming form the speakers? That's your latency at work. Now try to imagine trying to sing or play along with a recording, where the pre-recorded bits are THAT far apart from what you are contributing. It won't be music. It'll be audible chaos.

What Do We Do?
Fortunately we have a easy and free solution in the form of ASIO4ALL, a "free to the end user" project that acts as an ASIO driver for your Windows PC. In simplest terms, it will add support for ASIO, which is an open audio driver format that bypasses a lot of the operating system overhead and goes directly to the hardware.

Does This Replace Anything?
ASIO4ALL does not replace anything on your system - it is simply another option you can use in your audio programs (you'll see ASIO4ALL as an audio device to use). It doesn't replace anything, it doesn't overclock anything, it just acts as a good traffic cop. The worst it can do it give you more options to experiment with on your computer. Options are ALWAYS a good thing to have.

How Do I Use It?
You run the installer and that's most of it. When you launch your DAW or other audio processing program, you should be able to find an option to use the ASIO4ALL audio driver/audio interface/audio system (the exact term depends on the program). Most audio programs will let you interface directly into it, so it really acts as a fully integrated piece of your gear. (For example, in REAPER, Tools->Options->Audio->Device->Audio System shows ASIO4ALL as a selectable "Audio System", and the "ASIO Configuration" on that screen will launch ASIO4ALL's control panel).

In the control panel, you'll see a list of all audio interfaces it identifies in your system. In the lower left is a slider marked "ASIO Buffer Size = XXX Samples". Most the slider to the left to decrease latency, and to the right to increase latency. You can experiment with your system by lowering it, playing something, and then adjusting some more. If you reach a point where the audio is breaking up/crackling or otherwise sounds bad, then you need to increase the buffer size. That's pretty much it. (There is an Advanced Options menu, but if you want to go in there, you'd better read the ASIO4ALL documentation really carefully! Most of the options are way more than most users need.) Once you set it, everything should be fine.

Any Other Advantages?
In addition to controlling latency on a per-interface level, ASIO4ALL is seen as a single audio system by the PC. This means that you can use multiple that means you can run multiple physical audio devices at the same time, even in programs that only support a single device. In a normal program, if you select DirectSound, WDM, or one of the other non-ASIO drivers, you will be limited to 1 input device and 1 output device. Running ASIO4ALL, I can use sound card inputs at the same time as USB inputs and the program doesn't mind. Without ASIO in the middle, this would not usually be possible.

If you want to give it a spin, you can find it at http://asio4all.com.

At the time of the writing, the current version of ASIO4ALL is v.29 beta 4.

Read the full post here!

Terminology: ASIO

ASIO, which is an acronym for Audio Stream Input/Output, is a (primarily) Windows-based open audio driver protocol. ASIO was developed by Steinberg (the same company responsible for the VST plug-in format). The primary goal of the ASIO protocol is to bypass the many layers of audio processing inherent in the design of Windows audio systems. By bypassing these additional layers, the speed at which the audio can be processed is decreased.

ASIO is not very commonly seen on other Operating Systems, since most major Operating Systems (other than Windows) do not suffer from the same latency issues.

Read the full post here!

Tuesday, September 23, 2008

Why Loops Won't Make You Famous

In today's world of DIY music, there are more people than ever creating their own music, thanks primarily to inexpensive, easily obtained music programs. Many of these programs are based on the idea of loops. For those who are new to the scene, loops are canned, individual snippets of music that are trimmed so they can be played in a loop indefinitely.

There are quite a number of very successful consumer-grade packages that offer impressive quantities of loops, like Sony ACID, and M-Audio's Session. It's easy to load a few loops, stack them up, and make a decent sounding song.

There are a few problems with loops, as I see it. First, you are basically remixing someone else's creativity. Granted, most loops aren't terribly creative. But even so, any music you make with purchased loops will not be your own music. There are occasions where a few sampled loops of really strong beats or riffs do make it into the popular musical vocabulary (James Brown's famous "Funky Drummer" beat a good example of a loop that has been used in thousands of songs). But the key there is that the successful songs that use such elements are not completely made of other people's work.

Before the era of ready-made loop libraries, we had people trying basically the same thing, to horrible consequences. A prime example of looping gone bad is Vanilla Ice's "Ice Ice Baby". It was a big hit -- until people realized he had completely ripped off the intro riff to the Queen & David Bowie classic "Under Pressure" and looped it through his entire song. That was the first major nail (and lawsuit) in his thankfully short-lived career. Could he have lasted longer with something truly original? Maybe, if it was good. (Okay, I highly doubt it.)

Imagine this scenario: You finish your first album and get some interest from a record label. Some astute audiophile at the label recognizes every sound in your songs (except, possibly vocals) are bundled with ACID or another popular loop software. I'm willing to bet that will be a deal breaker. Why? Record labels want creativity, not re-mixers.

I strongly believe that the use of canned loops is not creating music. It is the musical equivalent of making scenes out of clip art and considering yourself an original artist. Nope. You are doing image layout, not creation. You shouldn't expect to be hired as an original artist for clever use of clip art. Loop tools and loop libraries are first and foremost musical toys.

Now I'm sure some loop users are upset and think I'm way off base. Don't get me wrong, loops have their place. If you create your OWN loops and use them in your music, that is a completely different animal. In that case, you are creating your own building blocks and making something wholly original from your own snippets. If you want your drum pattern to go on for an extended period of time, it's a great time saver to loop it (you really should introduce variations into any repeated pattern to give a more human feel to it, but it's your choice). Again, I'll stress that is YOUR drum pattern, not one you pulled out of a box.

Music is about creativity, not cut-and-paste. Please, give yourself some credit and put yourself into your music. Your work will be stronger in the long run if you avoid the musical crutches that are all too available. You will know the difference. Your audience will know the difference, too.

Originality shines like a beacon in our current musically saturated world. Let's let the world know what we sound like.

Read the full post here!

Saturday, September 20, 2008

Gear Review: M-Audio KeyStudio 25

I came to the realization very early on my musical career that it is basically impossible to let your creativity free-flow while programming your tunes one note at a time, either using a normal PC keyboard or by clicking on notes on the screen. Don't get me wrong, there is a place and time where alternate entry forms, like a piano roll are appropriate, but it is no match for noodling on an actual music keyboard and having tunes pop out at you.

What I Needed
My requirements were simple: I needed a keyboard controller that was not very expensive, small enough to not get in the way when I didn't need it, have some level of controls beyond just piano keys. My search led me scouring the web until I found a MIDI controller that seemed to fit the bill, and to me, seems to be completely overlooked by musicians.

What I Found
The KeyStudio 25 from M-Audio is a wonderful 25 key MIDI controller, with velocity-sensitive keys, Pitch Bender, 8 assignable knobs, 8 assignable buttons, Octave change buttons, support for a sustain pedal, volume slider, and a host of other on-board functions, it can draw power from the USB port or from an external power supply, and has a power switch so you don't have to unplug it whenever you are done with it. There, I've gotten the main list taken care of. Oh, yes, it comes bundled with Session, which pretends to be a music program but is a beginner's toy, mostly useful only if you want to see if the keyboard works. (I'll write more about Session at another time).

Ease Of Use
To get this keyboard fired up, you can just plug it into the USB port and turn it on. If you want Windows to use the proper driver, you can install M-Audio's software. I was using the keyboard fine before I ever installed from the CD. Anyway, I tried it out with REAPER, and once I changed my input to this device (which oddly shows as USB 02 In, perhaps showing off that it is in fact based on the O2 line of more expensive M-Audio controllers), it worked like a charm.

Keyed Up
The keys have a good weight to them - nowhere near as heavy as a real piano, but they have enough mass that this doesn't feel like a toy. The keys themselves seem to be OK for a home studio, but I definitely wouldn't want to take this out as a touring keyboard. The plastic keys seem like they might be a bit more fragile, though I haven't (and won't) subject the keyboard to any stress tests. In my testing, the velocity sensitivity on the keys is captured and encoded properly, so your DAW will get an accurate recording of your playing.

We Have Control
The part I like best about the keyboard is probably the assignable knobs and buttons. If you desire, you can remap nearly everything on the keyboard to an alternate MIDI command trigger. Want to send a note with a button (instead of a key)? No problem. Remap the pitch bend control to be a different control? Easy. I usually keep the knobs and buttons at their defaults and use the "MIDI Learn" in my DAW so I don't have to keep monkeying about with different settings for different songs/projects.

Software Blips and Glitches
My biggest unhappiness is really with M-Audio's software. Not only am I disappointed with their Session software, but the KeyStudio 25 manual says I can use their "Enigma" configuration and librarian software for this keyboard - just download it from their site. On their site, it does NOT list this keyboard as being compatible. I downloaded it anyway, only to discover it doesn't load at all. Apparently, Windows XP Media Center Edition is not an officially supported OS, although every other Windows OS is supported. I have seen this on other products before, and I'm really not sure why companies seem to have gone out of their way to ignore support for users who bought new PCs in the 2005-2006 time frame.
It does, however, come with 21 generally decent VSTs as part of the Session installation. These are standard VSTs, and you can point your DAW at them. There's nothing amazing about them, but they do seem to be stable and produce reliable results.
Still, I bought this for the controller. Everything else I like is gravy to me.

Big Brother
There is a big brother to this keyboard, which is a 49 key controller for about the same price. The 49 key keyboard is missing the assignable knobs and buttons, but does come with an built-in audio interface and a piano sound. Whoopee. I'd rather have the extra knobs for the control aspect, and I am using it as a programming tool more than a performance device, so who needs the piano sound?

Another Way To Get It?
I'm not positive, but I believe M-Audio's KeyRig 25 package comes with this same controller, but with their KeyRig software instead of Session. I'm not positive, but the features list and the pictures look identical.

Wrap It Up, I'll Take It
At the end of the day, I have to say I'm still very happy with my purchase of this MIDI keyboard controller. It is compact, but still feels good to play, and it gives me a mini-control surface that I can use for minor fiddling with my DAW settings. It is too small a keyboard for "serious" keyboardists and pianists, but my use is more as a scratch-pad input device. For that purpose, this is a stellar keyboard.

The major music retailers don't appear to carry this, but I've found it at Best Buy (in-store only) as well as at Amazon.com. Street price is around $100.

Read the full post here!